

Logical Architecture
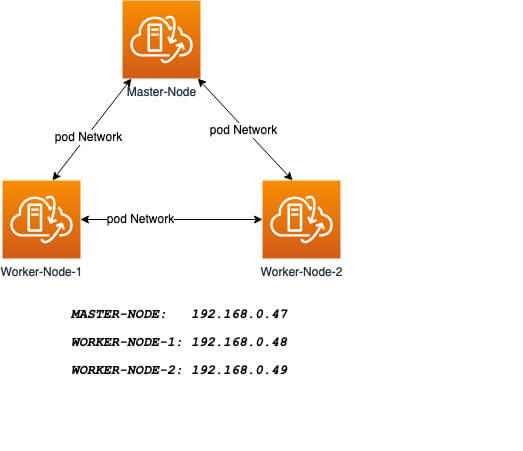
Our installation is designed to have the Master-Node controlling the Worker Nodes. At the end of this installation, our logical architecture will look something like this.
Master Node – This machine generally acts as the control plane and runs the cluster database and the API server (which the kubectl CLI communicates with).
Our 3-node Kubernetes Cluster will look something like this:
Installation of Kubernetes Cluster on Master-Node
For Kubernetes to work, you will need a containerization engine. As mentioned, we will be using Docker-CE.
The following institutions will be performed on CentOS 8 Master-Node.
Step 1: Prepare Hostname, Firewall, and SELinux
On your CentOS 8 Master-Node, set the system hostname and update DNS in your /etc/hosts file.
# hostnamectl set-hostname master-node
# cat <<EOF>> /etc/hosts
192.168.0.47 master-node
192.168.0.48 node-1 worker-node-1
192.168.0.49 node-2 worker-node-2
EOF
Next, ping your worker-node-1 and worker-node-2 to check if your updated host file is working correctly using the ping command.
# ping 192.168.0.48
# ping 192.168.0.49
Next, disable Selinux, as this is required to allow containers to access the host filesystem, which is needed by pod networks and other services.
# setenforce 0
Setting setenforce to 0 effectively sets SELinux to permissive, which effectively disables SELinux until the next reboot. To completely disable it, use the below command and reboot.
# sed -i --follow-symlinks 's/SELINUX=enforcing/SELINUX=disabled/g' /etc/sysconfig/selinux
# reboot
Kubernetes makes use of various ports for communication and access and these ports need to be accessible to Kubernetes and not limited by the firewall.
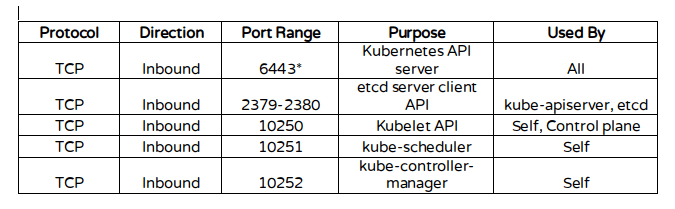
Configure the firewall rules on the ports.
# firewall-cmd --permanent --add-port=6443/tcp
# firewall-cmd --permanent --add-port=2379-2380/tcp
# firewall-cmd --permanent --add-port=10250/tcp
# firewall-cmd --permanent --add-port=10251/tcp
# firewall-cmd --permanent --add-port=10252/tcp
# firewall-cmd --permanent --add-port=10255/tcp
# firewall-cmd --reload
# modprobe br_netfilter
# echo '1' > /proc/sys/net/bridge/bridge-nf-call-iptables
Step 2: Install Docker-CE on CentOS 8
You will need to add the Docker repository first as it is no longer in the default package list using the following dnf config-manager command.
# dnf config-manager --add-repo=https://download.docker.com/linux/centos/docker-ce.repo
Also install containerd.io package which is available as a daemon that manages the complete container lifecycle of its host system, from image transfer and storage to container execution and supervision to low-level storage to network attachments and beyond.
# dnf install https://download.docker.com/linux/centos/7/x86_64/stable/Packages/containerd.io-1.2.6-3.3.el7.x86_64.rpm
Now install the latest version of a docker-ce package.
# dnf install docker-ce
You can now enable and start the docker service.
# systemctl enable docker
# systemctl start docker
Step 3: Install Kubernetes (Kubeadm) on CentOS 8
Next, you will need to add Kubernetes repositories manually as they do not come installed by default on CentOS 8.
# cat <<EOF > /etc/yum.repos.d/kubernetes.repo
name=Kubernetes baseurl=https://packages.cloud.google.com/yum/repos/kubernetes-el7-x86_64 enabled=1 gpgcheck=1 repo_gpgcheck=1 gpgkey=https://packages.cloud.google.com/yum/doc/yum-key.gpg https://packages.cloud.google.com/yum/doc/rpm-package-key.gpg EOF
Kubeadm helps you bootstrap a minimum viable Kubernetes cluster that conforms to best practices. With kubeadm, your cluster should pass the Kubernetes Conformance tests.
Kubeadm also supports other cluster lifecycle functions, such as upgrades, downgrade, and managing bootstrap tokens. Kubeadm is also integration-friendly with other orchestration tools like Ansible and Terraform.
With the package repo now ready, you can go ahead and install kubeadm package.
# dnf install kubeadm -y
When the installation completes successfully, enable and start the service.
# systemctl enable kubelet
# systemctl start kubelet
Step 4: Create a control-plane Master with kubeadm
The Kubernetes master which acts as the control plane for the cluster runs a few critical services necessary for the cluster. As such, the initialization process will do a series of prechecks to ensure that the machine is ready to run Kubernetes. These prechecks expose warnings and exit on errors. kubeadm init then downloads and installs the cluster control plane components.
Now it’s time to initialize Kubernetes master, but before that, you must disable swap in order to run “kubeadm init“ command.
# swapoff -a
Initializing Kubernetes master is a completely automated process that is controlled by the “kubeadm init“ command as shown.
# kubeadm init
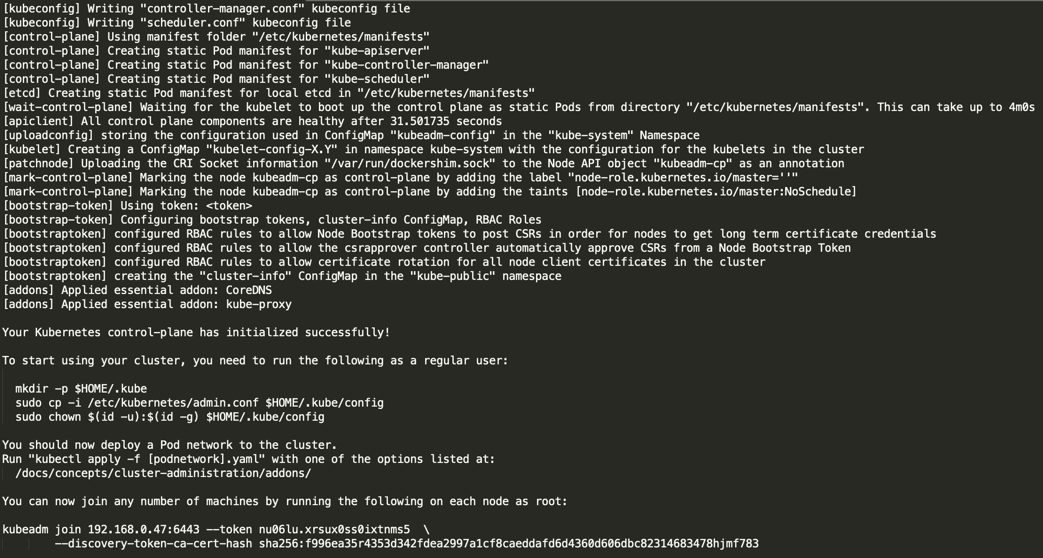
Next, copy the following command and store it somewhere, as we required to run this command on the worker nodes later.
kubeadm join 192.168.0.47:6443 --token nu06lu.xrsux0ss0ixtnms5 \ --discovery-token-ca-cert-hash ha256:f996ea35r4353d342fdea2997a1cf8caeddafd6d4360d606dbc82314683478hjmf7
Tip: Sometimes the above command might throw errors about the arguments passed, so to avoid errors, you need to remove the ‘\’ character and your final command will look like this.
# kubeadm join 192.168.0.47:6443 --token nu06lu.xrsux0ss0ixtnms5 –discovery token-ca-cert-hash sha256:f996ea35r4353d342fdea2997a1cf8caeddafd6d4360d606dbc82314683478hjmf7
Once Kubernetes initialized successfully, you must enable your user to start using the cluster. In our scenario, we will be using the root user. You can also start the cluster using sudo user as shown.
To use root, run:
# mkdir -p $HOME/.kube
# cp -i /etc/kubernetes/admin.conf $HOME/.kube/config
# chown $(id -u):$(id -g) $HOME/.kube/config
To use a sudo enabled user, run:
$ mkdir -p $HOME/.kube
$ sudo cp -i /etc/kubernetes/admin.conf $HOME/.kube/config
$ sudo chown $(id -u):$(id -g) $HOME/.kube/config
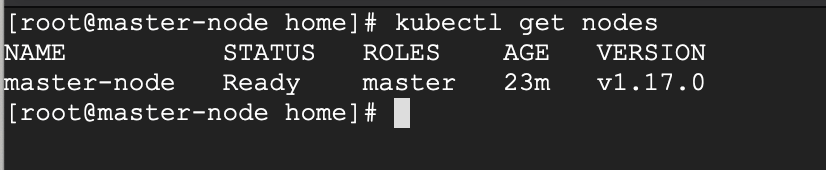
Now confirm that the kubectl command is activated.
# kubectl get nodes

At this moment, you will see the status of the master-node is ‘NotReady’. This is because we are yet to deploy the pod network to the cluster.
The pod Network is the overlay network for the cluster, that is deployed on top of the present node network. It is designed to allow connectivity across the pod.
Step 5: Setup Your Pod Network
Deploying the network cluster is a highly flexible process depending on your needs and there are many options available. Since we want to keep our installation as simple as possible, we will use Weavenet plugin which does not require any configuration or extra code and it provides one IP address per pod which is great for us.
These commands will be important to get the pod network setup.
# export kubever=$(kubectl version | base64 | tr -d '\n')
# kubectl apply -f "https://cloud.weave.works/k8s/net?k8s-version=$kubever"

Now if you check the status of your master-node, it should be ‘Ready’.
# kubectl get nodes
Next, we add the worker nodes to the cluster.
Adding Worker Nodes to Kubernetes Cluster
The following instructions will be performed on each worker node when joining the Kubernetes cluster.
Step 1: Prepare Hostname, Firewall, and SELinux
First set the hostname on your worker-node-1 and worker-node-2, and then add the host entries to the /etc/hosts file.
# hostnamectl set-hostname 'node-1'
# cat <<EOF>> /etc/hosts
192.168.0.47 master-node
192.168.0.48 node-1 worker-node-1
192.168.0.49 node-2 worker-node-2
EOF
Next, ping your master node from your worker nodes to confirm that your updated host file is working fine using the ping command.
# 192.168.0.47
Next, disable SElinux and update your firewall rules.
# setenforce 0
# sed -i --follow-symlinks 's/SELINUX=enforcing/SELINUX=disabled/g' /etc/sysconfig/selinux
# firewall-cmd --permanent --add-port=6783/tcp
# firewall-cmd --permanent --add-port=10250/tcp
# firewall-cmd --permanent --add-port=10255/tcp
# firewall-cmd --permanent --add-port=30000-32767/tcp
# firewall-cmd --reload
# echo '1' > /proc/sys/net/bridge/bridge-nf-call-iptables
Step 2: Setup Docker-CE and Kubernetes Repo
Add the Docker repository first using DNF config-manager.
# dnf config-manager --add-repo=https://download.docker.com/linux/centos/docker-ce.repo
Next, add the containerd.io package.
# dnf install https://download.docker.com/linux/centos/7/x86_64/stable/Packages/containerd.io-1.2.6-3.3.el7.x86_64.rpm
With these two packages installed, install the latest version of docker-ce.
# dnf install docker-ce
Enable and start the docker service.
# systemctl enable docker
# systemctl start docker
You will need to add Kubernetes repositories manually as they do not come pre-installed on CentOS 8.
# cat <<EOF > /etc/yum.repos.d/kubernetes.repo
name=Kubernetes baseurl=https://packages.cloud.google.com/yum/repos/kubernetes-el7-x86_64 enabled=1 gpgcheck=1 repo_gpgcheck=1 gpgkey=https://packages.cloud.google.com/yum/doc/yum-key.gpg https://packages.cloud.google.com/yum/doc/rpm-package-key.gpg EOF
Step 3: Install Kubeadm on CentOS 8
With the package repo now ready, you can go ahead and install kubeadm.
# dnf install kubeadm -y
Start and enable the service.
# systemctl enable kubelet
# systemctl start kubelet
Step 4: Join the Worker Node to the Kubernetes Cluster
We now require the token that kubeadm init generated, to join the cluster. You can copy and paste it to your node-1 and node-2 if you had copied it somewhere.
# kubeadm join 192.168.0.47:6443 --token nu06lu.xrsux0ss0ixtnms5 --discovery-token-ca-cert-hash sha256:f996ea35r4353d342fdea2997a1cf8caeddafd6d4360d606dbc82314683478hjmf78
As suggested on the last line, go back to your master-node and verify if worker node-1 and worker node-2 have joined the cluster using the following command.
# kubectl get nodes
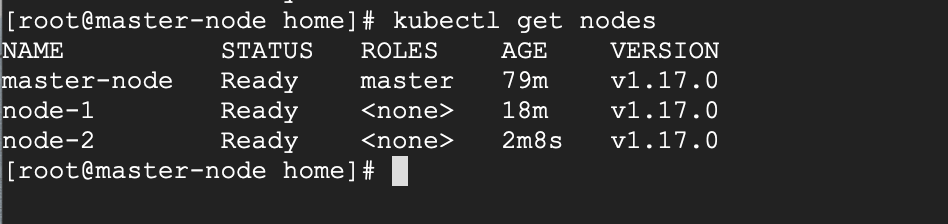
If all the steps run successfully, then, you should see node-1 and node-2 in ready status on the master-node. At this point, you have now successfully deployed a Kubernetes cluster on CentOS 8.
Got a project that needs expert IT support?
From Linux and Microsoft Server to VMware, networking, and more, our team at CR Tech is here to help.
Get personalized support today and ensure your systems are running at peak performance or make sure that your project turns out to be a successful one!
CONTACT US NOW