In this article, we’ll go over some of the new and cool features included in the Windows Server 2008 R2 DHCP server.
Introduction
DHCP is something most IT pros take for granted. However, it wasn’t really all that long ago when many of us were running local NetBEUI networks, where addressing wasn’t even an issue. On NetBEUI networks, all you needed to do was name the computers whatever names you wanted, making sure that you didn’t duplicate names, and you were good. Of course, being a broadcast based name resolution protocol that wasn’t routable meant there was a healthy amount of traffic on your single broadcast domain.
Then along came the Internet and with it, the TCP/IP protocol. With TCP/IP, we saw big improvements in network performance because not everyone was on the same Ethernet broadcast domain; we could now have routed networks. The whole name resolution process changed, in that now we needed to think about using DNS for name resolution on our networks. And addressing? We didn’t need to worry about addressing at all with NetBEUI but now with TCP/IP addressing was everything.
When we were just starting out with TCP/IP, many of us manually assigned addresses on our small networks. But then we discovered the conveniences of DHCP and how DHCP can automatically assign IP addresses to the computers on the network. What a wonderful discovery that was; by using DHCP we could assign IP addresses, subnet masks, domain names, default gateway and even more by using DHCP options. It was clear that DHCP was here to stay and would be a constant companion in our networking lives.
However, that was over 20 years ago and the excitement about DHCP has faded quite a bit in the interim. You design and then plan your DHCP network infrastructure, and then you deploy it. You back up the databases and restore them when you need to. That’s about it. It just works and rarely do you hear any complaints about addressing issues.
But now, with Windows Server 2008 R2, there’s something new on the DHCP front, and in this article, I’ll tell you about these cool new features. The new DHCP features that you’ll find in Windows Server 2008 R2 include:
- MAC addressing filtering for DHCP leases
- Generate link layer address filtering lists from current leases
- Create reservations from current leases
- DHCP name protection
- Create new DHCP options that apply only to reservations
- Integration with NAP
- DHCP logging enhancements
- DHCP Split Scope Wizard
- Delayed DHCP Server Response Setting
MAC addressing filtering for DHCP leases
In Windows Server 2008 R2 you can now create “allow” and “deny” filter lists for MAC addresses in DHCP. We’re used to creating such lists on small wireless networks, but why not do the same thing on both your wired and wireless networks? You can make it easier to exert some control over who connects to your network by configuring your MAC address allow and deny lists in your DHCP server.
You can access this feature by opening the DHCP console and navigating down to the Filters node in the IPv4 tree (note that filters are not available for IPv6 addresses). You have two options when you right click the Allow or Deny node – New Filter and Enable. In general, you should have your list of MAC addresses that you want to allow or deny first, then create the filter entries, and then enable the allow or deny options. You can see an example of this in the figure below.
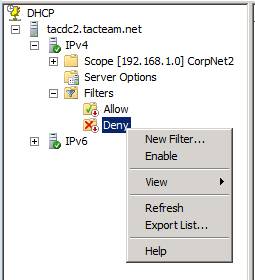
Figure 1
When you select the Filter option, you will see the New Filter dialog box, where you enter a MAC address and an optional Description.
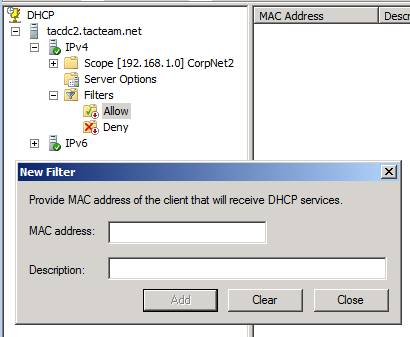
Figure 2
You’d think that after you click Enable it will enable MAC address filtering for your allow and deny lists. However, there is one more thing you need to do. Right click IPv4 in the left pane of the console and click Properties. Then in the IPv4 Properties dialog box, click the Filters tab. Put checkmarks in the Enable Allow List and/or Enable Deny List depending on what you want to do. Note the warning here: clients that had previously received IP addresses will be denied address renewal, unless their MAC addresses/patterns are present in the allow list. So, before you start your MAC address filtering, make sure to read the next section, which will make entering MAC addresses in your allow list a lot easier.
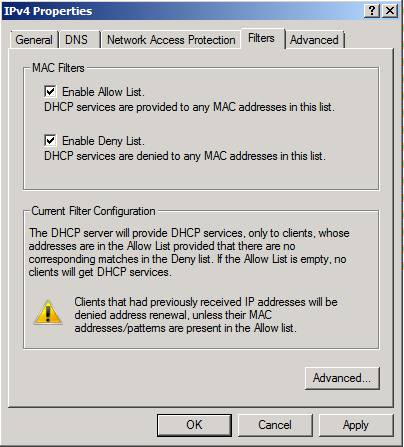
Figure 3
Generate reservations and link layer address filtering lists from current leases
You could add new filtering lists by entering the MAC addresses of all the machines on your network in an Excel spreadsheet and then entering each of these, one at a time, in the DHCP console. However, that would take a while. The new DHCP console makes it easier to add MAC addresses to your filter list by using your existing leases. All you need to do is select one or more of the reservations from the list, then right click and then click Add to Filter and then Allow or Deny, as you can see in the figure below. This is a lot better than trying to hunt down MAC addresses and entering them one at a time.
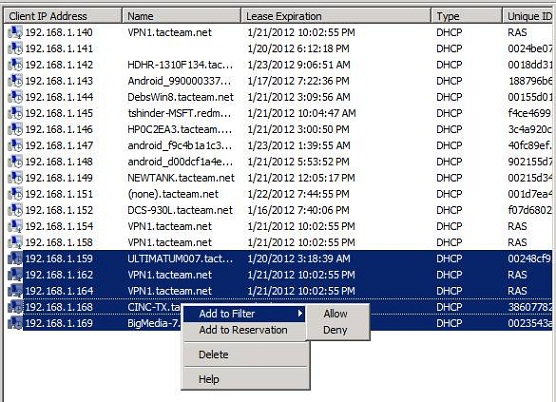
Figure 4
Notice when we right click on the entry in the leases list that there is another option: Add to Reservation. All you need to do it select one or more entries in the leases list and then right click the selection and click Add to Reservation. After you do that, you’ll see a dialog box informing you that the lease was added to a Reservation, as seen in the figure below.
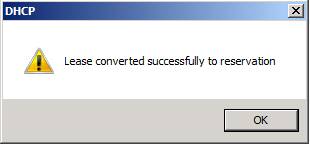
Figure 5
DHCP Name Protection
The Windows Server 2008 R2 DHCP server can work together with DNS to prevent DNS name entries from being overwritten. Right click IPv4 in the left pane of the console and click Properties. In the IPv4 Properties dialog box, click the DNS tab, as seen in the figure below.
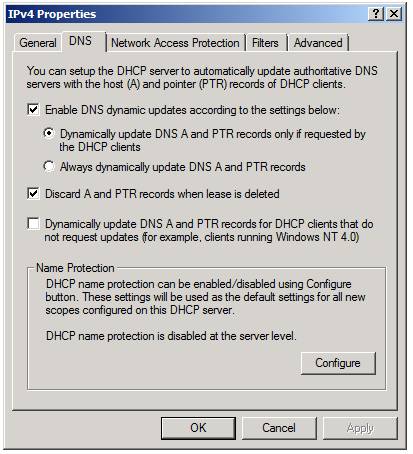
Figure 6
In the Name Protection frame, click the Configure button.
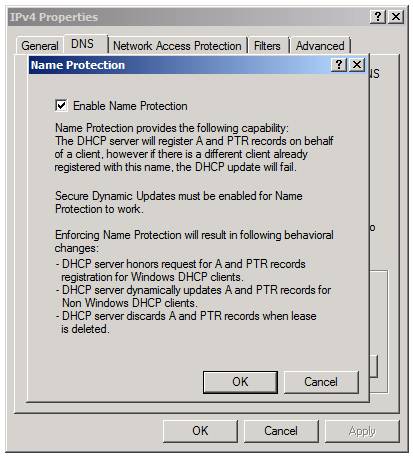
Figure 7
When this option is enabled, the DHCP server will register A and PTR records on behalf of the client. However, if there is a name already registered in DNS which is the same, the DHCP update will fail. There are a few things you need to understand about this feature before you use it:
- DHCP will honor requests for A and PTR records registration for Windows DHCP clients
- DHCP server will dynamically update A and PTR record for non-Windows DHCP clients
- DHCP server will discard A and PTR records when a lease is deleted
- Secure Dynamic Updates must be enabled for Name Protection to work
Create new DHCP options that apply only to reservations
Reservations are often created for servers with specific purposes that lie outside the general IP address settings that you would assign to other machines on the network. For example, you might want to configure specific routes or name servers or default gateways to machines that have a DHCP reservation. You can do this by navigating to the Reservations folder in the left pane of the console and then expanding that node and clicking on the name of the machine with the reservation to which you want to assign specific DHCP options, as seen in the figure below.
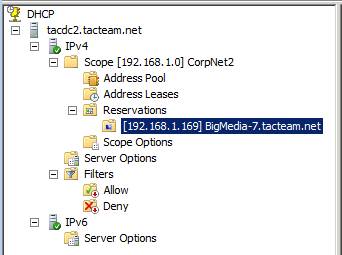
Figure 8
Right click the name of the machine and then click Configure Options. This brings up the Reservation Options dialog box, as seen in the figure below. Select and configure your DHCP options and they will be applied only to this machine. Nice huh?
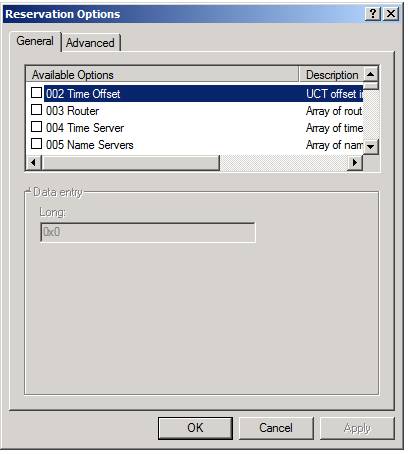
Figure 9
Integration with NAP
NAP is Network Access Protection, which is a NAC (Network Access Control) type feature in Windows Server 2008 R2 that allows you to control, to a certain extent, which devices can connect to your network. NAP uses three methods that you can choose from to allow you to control who can connect to your network:
- DHCP Enforcement
- IPsec Enforcement
- 802.1X Enforcement
If you choose to use DHCP enforcement, machines that pass NAP inspection will be allowed to connect to the network through assignment of a valid IP address assigned via DHCP. NAP configuration is somewhat complex and involves configuration of several servers and services, including Group Policy, Network Policy Services, DHCP and others. We won’t go into all of that here, but you can find out more on Microsoft’s TechNet site. Our focus here is DHCP, and if you want to use DHCP enforcement, you will need to configure the DHCP server. Here’s how:
Right click IPv4 in the left pane of the console and click Properties. In the IPv4 Properties dialog box, click the Network Access Protection tab. On this tab, you have these options:
- Enable on all scopes
- Disable on all scopes
These options allow you to enable NAP DHCP enforcement on all scopes, and if you enable it and then want to disable it, to disable NAP DHCP enforcement on all scopes. Also, as you can see in the figure below, you can control DHCP server behavior when the Network Policy Server (NPS) is unreachable. You have the option of granting the clients Full Access, Restricted Access or Drop Client Packet.
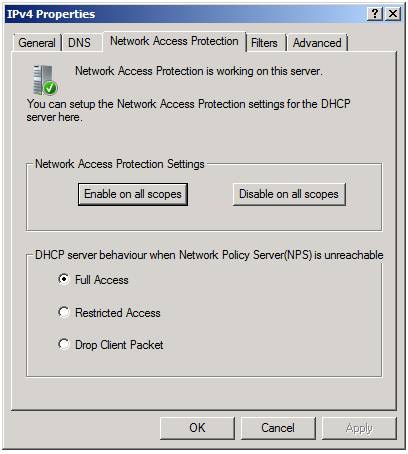
Figure 10
DHCP logging enhancements
You get a lot more logging information in the Windows Server 2008 R2 DHCP server. Whenever you make a change to the DHCP configuration, you will see information about that change in the Event Viewer. Also, a daily log is kept that records DHCP activity in the location %Systemroot%\system32\DHCP. You can see an example of that log in the figure below.
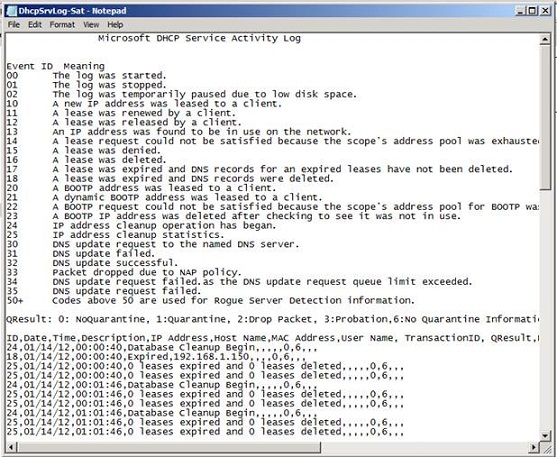
Figure 11
You can also install the DHCP Server Events Tool MMC snap-in to get to this information. For more information on this tool, check out this link.
DHCP Split Scope Wizard and Delayed DHCP Server Response Setting
As a best practice, you should split your DHCP scopes among multiple DHCP servers, so that a single DHCP server doesn’t end up being a single point of failure for IP addressing on your network. We have done this manually in the past, and sometimes it can be a challenge to set it up and get it working just the way you want it to, because the machines participating in the split scope configuration have no implicit knowledge of each other. This situation is significantly improved in Windows Server 2008 R2 with the introduction of the DHCP Split Scope Wizard. The new Split Scope Wizard makes it easy to configure split DHCP scopes among DHCP servers on your network. Included in this feature is the ability to control DHCP server responses, so that you can assign a preferred DHCP server.
This feature is somewhat involved, and it’s worth a discussion on DHCP split scopes, so I’ll cover the details of the Split Scope Wizard in a future article. However, if you want to play with this now, you can find the Split Scope Wizard by right clicking on the scope you want to split, and then pointing to Advanced and clicking Split Scope.
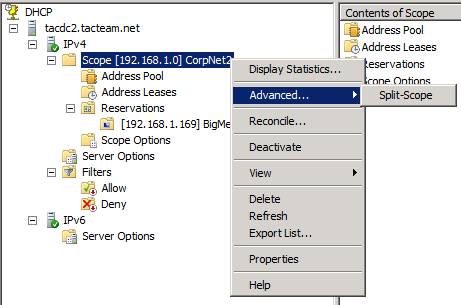
Figure 12
Summary
In this article, we went over some of the new and cool features included in the Windows Server 2008 R2 DHCP server. MAC filtering, options for reservations, DHCP name protection, NAP integration and the Split Scope Wizard can actually make DHCP fun again.


