

This article continues the Networking for Beginner series by talking about the difference between file level and share level permissions.
In the previous part of this article series, I began showing you how to create a network share that you can use to share resources located on a server. So far, we have created a share, but we have yet to give anyone access to it. In this article, I will continue the discussion by discussing the differences between file level and share level permissions.
Securing a Share
Although the entire point of creating a share is to allow users on your network to access the resources contained within the share, you still have to be careful about what level of access the users are given to those resources. For example, suppose that your human resources department has created a spreadsheet that lists the salary information for every employee in your company. Now suppose that everybody in human resources needs to be able to access the spreadsheet, and to make updates to it. Since the finance department is responsible for printing paychecks, they need to have access to the spreadsheet too, but you probably do not want them to be making any changes to it. Given the sensitive nature of the information in the spreadsheet, you probably would not want anyone else in the company to have access to it. With that in mind, let us take a look at how this type of security could be implemented.
The first thing that you need to understand about the share that you have created, is that there are two different types of security that you can apply to it. You have a choice of using share level security, file level security, or both.
Share level security applies directly to the share point that you have created. When the users connect to the SharePoint to access the files, the share level permissions that you have set are applied. In contrast, file level permissions are applied directly to files and folders rather than to the share.
The reason why there are two different types of permissions has a little bit to do with the evolution of Windows. The Windows operating system supports two different hard drive formats; FAT and NTFS. FAT is a legacy file system that has been around since the early 1980s. Because of its age, FAT is a no-frills file system, and does not support file level security. NTFS on the other hand, was designed with security in mind. You can apply file level security directly to files and folders residing on an NTFS volume.
Since the FAT file system does not support file level security, Microsoft allows you to use share level security as a way of getting around the file system shortcomings. Today the NTFS file system is used almost exclusively, and the FAT file system is all but extinct. You can still use share level permissions if you want to, but it is usually considered to be better practice to use file level permissions instead.
So what makes file level permissions so much better than share level permissions? For starters, share level permissions only apply if a user is accessing the files through the share. This can be a problem because Windows allows you to create multiple share points on a single volume. If the share points are created carelessly, they can overlap with each other. This can lead to users having unexpected levels of permissions to files and folders.
Another reason why file level permissions are preferable to share level permissions is because share level permissions do not provide any protection unless the user is accessing the files through the SharePoint. If a user were to log on to a server console locally, then they could browse the local hard drive without having to pass through SharePoint. If share permissions were the only types of permissions being used, then the user could theoretically have full access to the files within the share.
File level permissions also protect data if the server is booted to an alternate operating system, or if the hard drive is removed from the server and placed into a different machine. Share level permissions simply do not provide this kind of protection.
Since file level permissions are far superior to share level permissions, you may be wondering why you would want to create a share at all. You need to create shares, because shares act as an entry point for accessing the file system over the network. If you need to give users access to files on a file server, there really is not any getting around creating shares. However, you can secure the share using file level permissions rather than depending on share level permissions.
As you may recall, we created a folder named Data in the previous article, and then shared that folder. To set the permissions in this folder, right-click on it, and choose the Properties command from the resulting shortcut menu. When you do, you will see the folder’s properties sheet.
Now take a look at the properties sheet’s Sharing tab, as shown in Figure A. As you can see in the figure, this tab contains a Permissions button. You can click this button to set share level permissions for the share.
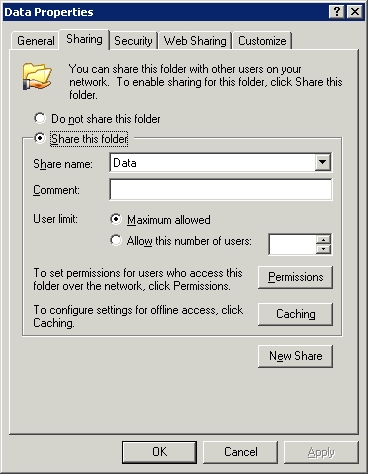
Figure A: The Permissions button is used to set share level permissions for the share
Now take a look at the Security tab. This tab is used to set file level permissions, starting at the folder to which the SharePoint has been bound. The first thing that you need to know about file level permissions is that under normal circumstances they make use of the concept known as inheritance. Inheritance simply means that when you set a permission, that permission applies not only to the folder, but to everything in it. This includes any subfolders that may exist and any files or folders within the subfolders.
Another thing that you need to know about file level permissions is that because of inheritance some permissions will apply automatically. If you take a look at Figure B, you can see that Security tab for the properties sheet that we have been looking at. As you can see in the figure, several different sets of permissions have already been applied. I do not expect you to understand what all of these settings mean just yet, but I will be talking about them in detail later on in this series. For now just be aware of the fact that some permissions are applied automatically.
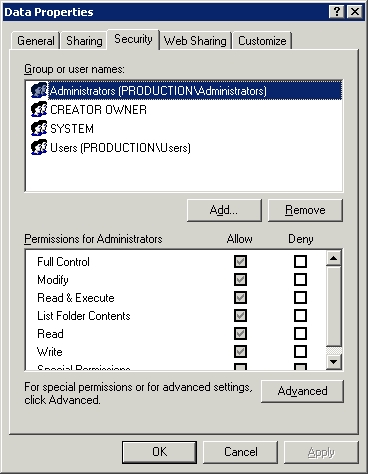
Figure B: The Security tab can be used to set file level security for the folder to which the share point is bound
If you look at the Security tab, you will notice that the top half of the tab contains a list of users and groups. The lower half of the tab contains a list of permissions. If you want to apply a set of permissions to a user or group, you simply select the user or group that you want to work with from the top half of the tab, and then set the permissions on the lower half of the tab. Of course, before you can set the permissions you need to understand what permissions actually mean. I will discuss the permissions in detail in the next part of this series.
In this article, I have explained that you can secure a SharePoint using either file level or share level permissions, or both. In the next article in this series, I will explain how the permissions themselves work, and how to apply permissions to files and folders.
Got a project that needs expert IT support?
From Linux and Microsoft Server to VMware, networking, and more, our team at CR Tech is here to help.
Get personalized support today and ensure your systems are running at peak performance or make sure that your project turns out to be a successful one!
CONTACT US NOW