Introduction
There’s no question that PowerShell is here to stay as an automation tool for Windows. And with it, comes a variety of ways to automate management Windows infrastructure. For sure one of the most important areas where PowerShell automation can provide big benefit, is in the management of Active Directory. AD lends itself to automation—whether it’s being able to create a bunch of users from a text file list, or add users to groups, or modify the “department name” on a set of users—PowerShell provides a relatively easy way to make those tasks quick and easy. In this article, I’ll walk through how you can get started using PowerShell to manage AD, and provide examples of some of the common tasks you can perform.
What Do I Need?
The first thing you need to get started is a PowerShell “module” that provides the cmdlets, or units of function, for managing AD. Of course, Microsoft provided an AD PowerShell module, starting with Windows Server 2008-R2 and Windows. Using this module requires something called the Active Directory Web Services (ADWS) service be running on at least one DC in the AD domain that you plan to manage. If your DCs are running Server 2008-R2 or above, then you are good to go—the ADWS is installed by default on these. If you are running an earlier version of Windows Server, like 2008 or 2003, as your domain controllers, you can install a standalone version of the ADWS so that you can use the cmdlets against these environments. The download is available here.
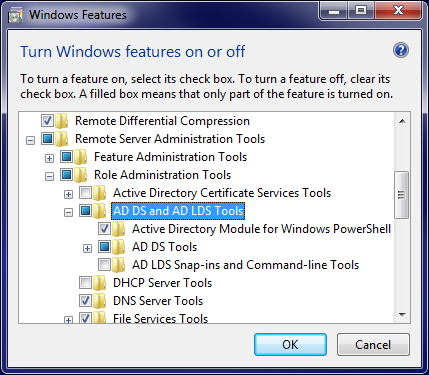
Once you have ADWS running on at least one DC, then you’re ready to get and use the PowerShell AD module. You’re going to need at least Windows 7 or Server 2008-R2 in order to install the cmdlets. If you are using a client Operating System, like Windows 7, or a non-DC Windows Server version, the AD module comes as part of the Remote Server Administration Tools (RSAT) download available on the Microsoft download center. Once you install the RSAT tools, go into the Control Panel, Program and Features applet, and select “Turn Windows Features on or off” and scroll down to the RSAT section. Under “Role Administration Tools”, expand the “AD DS & AD LDS Tools” node and select the “Active Directory Module for Windows PowerShell” checkbox, as shown in Figure 1, and then press OK. The install will then install the AD module.

Figure 1: Installing the AD Module from RSAT
Note that the AD module is already installed by default on a Server 2008-R2 or above Domain Controller, so you don’t need to perform this step if you’re working from your DCs.
Finally, I will mention that while the Microsoft AD module is a good one, and the one I’ll talk about in this article, it is by no means the only offering in this space. Long before Microsoft released their AD module, Quest Software had created a set of cmdlets for managing AD from PowerShell. This set of cmdlets is different than the Microsoft one, but it also works without ADWS and Windows 7 or above as a pre-requisite. You can download these cmdlets for free here.
Using the Cmdlets
The first thing you’ll need to do to use the cmdlets, is to load up the AD module into your PowerShell session. There’s at least a couple of ways to do that. The first, and most obvious, is to open the Administrative Tools Start Menu Program Group and select the “Active Directory Module for Windows PowerShell” shortcut, which will launch PowerShell and load the module. Alternatively, you can just start PowerShell yourself and type:
Import-module ActiveDirectory
And get the same effect. Now, how do you know where to begin? You can get a list of the cmdlets that are available in the AD module by typing in PowerShell:
Get-command –module ActiveDirectory
What you’ll see when you issue this command on Server 2008-R2 or Windows 7, is a list of 76 cmdlets that provide a variety of AD and AD LDS management functionality from PowerShell. I will also mention that the AD module comes with a “PSProvider”. The PSProvider lets you interact with AD as if it were a drive letter. So, you can “change directories” into your AD domain, do a “dir” of an OU and even write-changes to AD objects. That said, there’s probably fewer scenarios where that makes sense than just using the regular cmdlets, so I won’t be covering the PSProvider in this article. So let’s dive into some examples.
Creating a New User
The simplest example is creating a new user account. Let’s say we want to create a new user account in the Marketing OU and set a few properties on that account at creation. Let’s see how we can do that. The following PowerShell command calls the New-ADUser cmdlet to get the job done:
New-ADUser -Name “Ron Smith” -Enabled $true -SamAccountName “rsmith” -GivenName “Ron” -Surname “Smith” -DisplayName “Ron Smith” -Path ‘OU=Marketing,DC=contoso,DC=com’ -AccountPassword (Read-Host -AsSecureString “pwd”) -ChangePasswordAtLogon $true -HomeDirectory “\\server\home\rsmith” -HomeDrive “H:” -OtherAttributes @{‘comment’=”Created from PowerShell Script”}
This command is doing a lot of work. Let’s break it down by each parameter and see what is going on. First we call the New-ADUser and pass in the –Name parameter, that specifies the full name of the user. Next, we called the –Enabled parameter and pass $true, indicating we want to create the user account as enabled. Note that this will only work if we set a password for the user as well, since typically AD won’t let you create an enabled user account without a password if the domain requires a password.
Next, we set the SAMAccountName using the parameter of the same name. The next three parameters—GivenName, Surname and Displayname, set the user’s first, last and display name as it appears in AD. The Path parameter provides the Distinguished Name of the OU that I want to put this user account into. The AccountPassword parameter is interesting. It lets me assign a password to the user, but what you see after it requires some explanation. That block in parentheses, Read-Host -AsSecureString “pwd”), will prompt the user to enter a secure password after the command executes. It then passes that secure password to the parameter and continues on its way.
The next parameter, ChangePasswordAtLogon, flips the bit in the user account to require the new user to change their password at first logon. The HomeDirectory and HomeDrive parameters set those properties on the user and then finally the OtherAttributes parameter lets me populate attributes on the object that are exposed directly via a cmdlet parameter. In this example, I’m populating a PowerShell hashtable (@{}) with the key-value pairs I want to modify. In the example above, I have a single attribute—called “comment” that I am populating with some text indicating that the user was created from a PowerShell script.
Group Members
How about finding out quickly and easily, the members of a group, including all “recursive” memberships?
No problem, here’s a command that does the job to find all the members of the “Sales Users” group:
Get-ADGroupMember –Identity “Sales Users” –Recursive
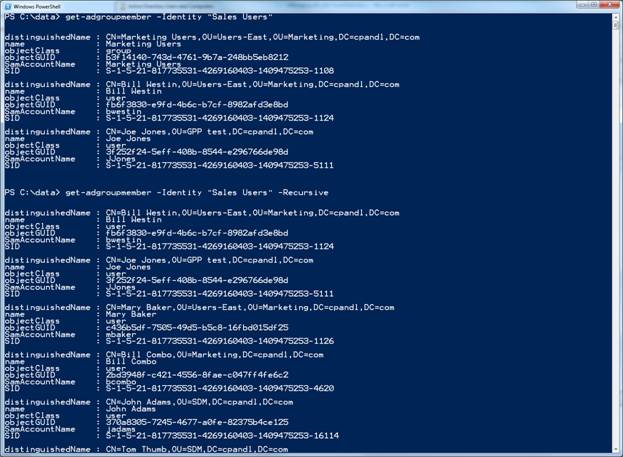
Figure 2 shows the difference between running this command without the Recursive parameter and with it.

Figure 2:Enumerating Group Memberships
Note that in the first instance, only 3 direct members were found, but in the second instance, all nested groups were enumerated and those members were found as well.
Miscellaneous Things You Can Do
With 75+ cmdlets, there’s obviously a lot more you can do with the AD module than I indicated above. Want to find out information about your current forest, including forest functional level, FSMO role holders, all the sites in the forest? Simply type:
Get-ADForest
And you can surface a bunch of information about your forest. Or, want to find out what the current password policy is for your domain? Simply type:
get-addefaultdomainpasswordpolicy
Which will return the current working password policy (not fine-grained password policy but GPO-based password policy) in place in the domain.
Want to unlock a user account who has locked themselves out? Try:
Unlock-ADAccount –Identity “rsmith”
In this example, I pass in the samAccountName of the user I had created earlier, using the Identity parameter, and, assuming I have rights in AD to do it, the user’s account in unlocked in seconds—no fuss, no muss!
Summary
I’ve only skinned the surface of what you can do with the AD module in PowerShell. There’s so many more cmdlets and scenarios you can automate, especially when you start to take the PowerShell pipeline into account, and use it to pipe the output of one cmdlet into the input of another. Many automation scenarios around AD account management start to present themselves. I hope this has given you a starting point for exploring what you can do with PowerShell and Active Directory!
Got a project that needs expert IT support?
From Linux and Microsoft Server to VMware, networking, and more, our team at CR Tech is here to help.
Get personalized support today and ensure your systems are running at peak performance or make sure that your project turns out to be a successful one!
CONTACT US NOW

