This article looks at how to use Remote Assistance in an environment where your desktop computers have Windows Firewall enabled.
Topics covered include using Group Policy to create a Remote Assistance exception for desktop computers, configuring computers to receive offers of Remote Assistance, and tips on using Remote Assistance.
Remote Assistance is one of those features that hasn’t quite lived up to its initial promise. It first appeared in Windows XP and was promoted by Microsoft in two ways: as a way for Help Desk departments to save on the cost of supporting users, and as a tool for home users to receive help from “experts” over the Internet. Unfortunately the second use hasn’t turned out to be as helpful as it was originally intended. The reasons for this are mainly related to networking hardware. With the advent of home networks having broadband connections to the Internet and protected behind NAT-enabled routers, the plain fact of the matter is that Remote Assistance doesn’t always work. In particular, if both the Novice (the user/computer needing assistance) and the Expert (the user/computer providing assistance) are both hidden behind NATs, then traditional invitation-based Remote Assistance just doesn’t work. And even if only one of them is behind a NAT-enabled router, Remote Assistance usually won’t work unless the router is Universal Plug and Play (UPnP) compliant so that incoming packets directed to port 3389 can be mapped to the client needing assistance. Finally, there are firewall issues associated with Remote Assistance and the bottom line here is that generally both the Expert and Novice computers must have their firewalls configured to allow both inbound and outbound traffic on port 3389. For Windows Firewall, this means opening up port 3389 for inbound connections only as no outbound filtering is performed, but this will soon change in Vista where the firewall will filter both outbound and inbound traffic. All this—hardware difficulties and firewall complexity—make Remote Assistance a difficult feature for many home users to make use of, and I personally don’t know anyone who has used it at home to get help for their computer problems.
Reducing support costs for Help Desks however is another thing, and that’s really where Remote Assistance shines. What’s not so well known however is that Help Desks can use Remote Assistance in two ways: users can request help when they need it, and experts can offer help when they feel users might benefit from it. Let’s briefly review the first type of Remote Assistance (invitations) and then go on and look how to implement the second type (Remote Assistance offers) in an enterprise where Group Policy is used to manage desktop configuration settings.
Remote Assistance Invitations
The first type of Remote Assistance is where the Novice requests help from the Expert. Once the Expert receives and accepts the invitation, she can view the desktop of the Novice’s computer, chat with him, and—provided the Novice gives permission—take control of the Novice’s computer and fix things. Novices can send Experts an invitation in three ways: using Windows Messenger, sending an email attachment, or transferring a file. To send an invitation, the Novice clicks Start, All Programs, Remote Assistance. This opens the Remote Assistance page in Help and Support:
Figure 1: Sending an invitation requesting help through Remote Assistance
Clicking the “Invite someone to help you” link gives the Novice the three options of sending the invitation through Messenger, email, or saving a file named RAInvitation.msrcincient on a floppy or network share where the Expert can access it. Email attachments and saved files can be password-protected to safeguard the information they contain, which otherwise is in plain XML text as in this invitation sent by Novice Bob Smith to Expert Mary Jones:
<?xml version=”1.0″ encoding=”Unicode” ?><UPLOADINFO TYPE=”Escalated”><UPLOADDATA USERNAME=”bsmith” RCTICKET=”65538,1,172.16.11.191:3389;XP191.r2.local:3389,*,7bfG9GaXrMdw8SqHVbMDlZ1b21B115HazASRMBl65tY=,*,*,iQoCERzPzTeeozOI1dGvG6QHGoo=” RCTICKETENCRYPTED=”0″ DtStart=”1137703014″ DtLength=”1800″ PassStub=”” L=”0″ /></UPLOADINFO>
To accept the invitation the Expert just has to open it and click Yes and the Remote Assistance console opens on the Expert’s machine. Meanwhile, a dialog appears on the Novice’s machine saying that the Expert has accepted the invitation and asking whether the Novice wants to let the Expert see their desktop and chat with them. If the Novice agrees, the Remote Assistance console opens on the tool that is open on the Novice’s desktop and the Expert now sees the Novice’s desktop within the Remote Assistance console on her own desktop. Here’s a screenshot using Virtual PC that shows the Novice’s desktop at the top left and the Expert’s at the bottom right:
Figure 2: Bob (the Novice) at top left and Mary (the Expert) at bottom left
If Mary needs to step in and take control over Bob’s computer to fix something, she can click the Take Control button on the toolbar at the top left of her Remote Assistance console. This prompts Bob to grant her permission to do so, and if he accepts then Bob’s keyboard and mouse are now under control of both him and Mary, so it’s best if, before taking control, the Expert advises the Novice not to use their keyboard and mouse until the Expert finishes fixing things and returns control to the Novice (either user can press ESC to end the Expert’s control of the session and return to view-only assistance).
Offering Remote Assistance
There are times however when Help Desk may want to offer assistance to a user even if the user hasn’t requested it. This is known as the Offer Remote Assistance feature and you need to know some things about it before you try implementing it. First, this only works when the computers of the Novice and Expert belong to the same domain or a trusting domain i.e. it won’t work in a workgroup scenario and is therefore not useful to most home users. Of course, this rules out Windows XP Home Edition as well, so it only works on Windows XP Professional (or Windows Server 2003). Second, you have to explicitly enable Novice computers to be able to receive and accept offers of Remote Assistance, and the usual way to do this is with Group Policy which is explained below. Third, before you configure Group Policy settings for Offer Remote Assistance, you have to define a list of experts that are authorized to help users on your network. This last step is very important as you don’t want just anyone to be able to offer Remote Assistance to your users as a hacker who compromised one of your machines could then offer to “help” your users and you know what that will mean.
So let’s start by configuring Group Policy to enable Offer Remote Assistance on some Novice computers. For our scenario, our Expert (Mary Jones) is in Vancouver and the Novice (Bob Smith) is in Winnipeg, so we’ll start by creating and linking a Group Policy Object (GPO) called WinnipegGPO to the Winnipeg organizational unit in our domain:
Figure 3: Using Group Policy to configure Offer Remote Assistance on Novice computers in Winnipeg
Open the WinnipegGPO using Group Policy Object Editor and navigate to Computer Configuration \ Administrative Templates \ System \ Remote Assistance \ Offer Remote Assistance:
Figure 4: The Offer Remote Assistance policy setting
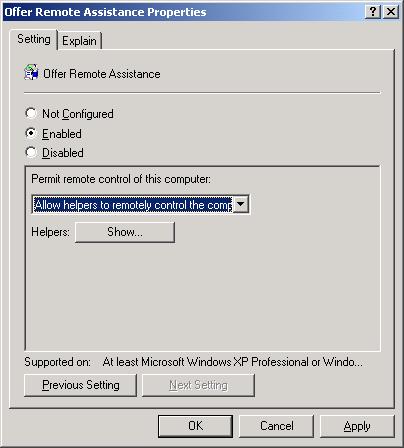
Open this policy, enable it and select either “Allow helpers to remotely control the computer” (the default) or “Allow helpers to only view the computer” as desired:
Figure 5: Enabling Offer Remote Assistance in take-control mode
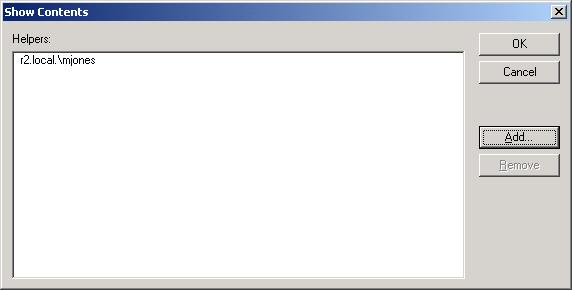
Click the Show button and add Mary Jones to the list of helpers (Experts) in the form domainname\username e.g. r2.local\mjones:
Figure 6: Adding Mary Jones to the list of users allowed to offer Remote Assistance
Note that you can also add groups of helpers in the form domainname\group if you prefer. Click OK to configure the policy and wait for it to apply to Novice computers during the next Group Policy refresh.
Note:
In Windows XP, members of the local Administrator’s group on the computer are automatically helpers by default. In a domain environment this means that members of the Domain Administrators group are helpers by default and can thus offer remote assistance without having to add them to the helpers list in this policy.
Note:
You may have noticed another policy in figure 4 called Solicted Remote Assistance. You can configure this policy to allow or deny Novices the ability to send remote assistance invitations to Experts on your network if you want to. Note also that prior to Service Pack 2, disabling this policy also caused Remote Assistance offers to fail, but this issue was fixed in SP2.
Now that you’ve configured Group Policy to enable Offer Remote Assistance on Novice computers in Winnipeg, you’ll need to do something else while you’re at it: configure Windows Firewall on these same computers to allow offers of Remote Assistance to be received. You can use Group Policy for this same purpose as follows. To do this, use Group Policy Object Editor again with the focus still on the WinnipegGPO and navigate to Computer Configuration \ Administrative Templates \ Network \ Network Connections \ Windows Firewall \ Domain Profile \ Windows Firewall: Define Port Exceptions:
Figure 7: Configuring Windows Firewall policy on Novice computers to allow Remote Assistance offers
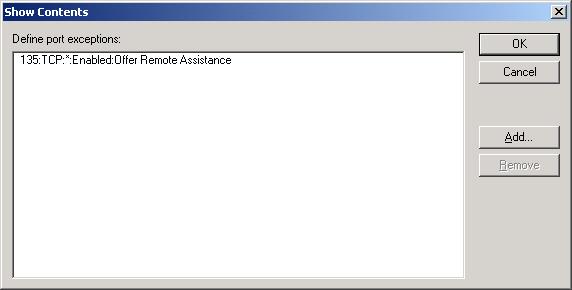
Open this policy, enable it, click Show, and define a port exception for TCP port 135 as shown below:
Figure 8: Creating a port exception for inbound traffic on TCP port 135 to receive Remote Assistance offers
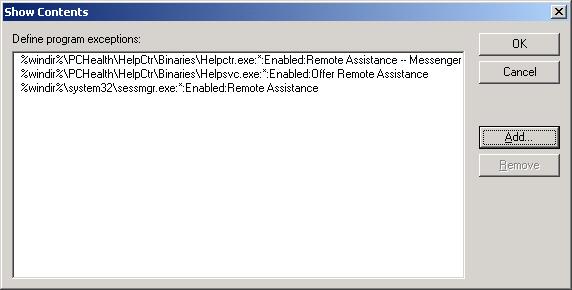
Now select the policy Windows Firewall: Define Program Exceptions, enable it, click Show, and define the three program exceptions shown below:
Figure 9: Creating program exceptions for Offer Remote Assistance
Repeat the above procedure with the Standard Profile if you need it, and then click OK to configure the policies and wait for them to apply to Novice computers during the next Group Policy refresh.
Now Mary should be able to offer Bob help using Offer Remote Assistance. To do this, Mary opens Help and Support and clicks on the link “Use tools to view your computer information and diagnose problems” on the main Help and Support page. On the next page (named Tools) she then clicks on the link “Offer Remote Assistance” and this opens the Offer Remote Assistance page where she types the computer name (or IP address) of Bob’s computer:
Figure 10: Mary offers Remote Assistance to users of a computer named XP191
When Mary clicks the Connect button, she is given the option of choosing which user on the remote computer she wants to help:
Figure 11: Mary offers Remote Assistance to Bob
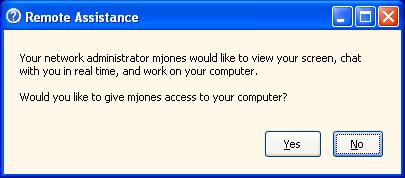
Mary then clicks the Start Remote Assistance button and the Remote Assistance console opens on her machine. Meanwhile, on Bob’s machine a prompt appears asking him if he wants to accept the offer from Mary:
Figure 12: Bob has to accept Mary’s offer to help
Once Bob accepts the offer, Mary can view Bob’s desktop and chat with him and—if the policy has been configured appropriately—click the Take Control button to take over control of Bob’s computer to fix things (Bob can of course still say No to this if he prefers i.e. the “take control” policy is not enforced, only enabled).
Got a project that needs expert IT support?
From Linux and Microsoft Server to VMware, networking, and more, our team at CR Tech is here to help.
Get personalized support today and ensure your systems are running at peak performance or make sure that your project turns out to be a successful one!
CONTACT US NOW

