Introduction
Wireless networks are wonderful things – when they work! But many consumers find that even if they manage to get their WLAN (wireless LAN) working, keeping it up and running reliably with good performance is often frustrating and a struggle. Though flaky equipment and improper setup can sometimes be the cause, all too often the growing popularity of WLAN equipment is itself the cause of wireless woes.
In this article, I’ll explain the causes of problems in closely-spaced wireless LANs (and dispel some myths). I’ll then give you fixes for common problems, and even tell you what not to waste your time trying.
So, how do you know that you have a problem from neighboring WLANs and not just something wrong with your own equipment? Take this little test:
- Your “View Available Wireless Networks” window shows wireless networks other than your own – and lots of ’em
- You keep losing connection to your AP, even when you’re in the same room
- Your wireless connection seems to crap out around the same time each day…usually in the late afternoon or early evening
- You overhear your neighbor talking about the problems he’s having with his wireless LAN
- You live in a dorm, apartment building or neighborhood with large homes on small lots and broadband Internet service
If any of these sound familiar, then you probably should read on. If, on the other hand, you live out in the boonies where your cell phone doesn’t even work and you have to drive over to see your neighbor, then this article probably isn’t going to be much help!
NOTE: Please read references to access points (AP) or wireless routers as applicable to both kinds of products unless otherwise noted.
What’s the problem?
The primary causes of wireless LAN problems in high-density areas are:
1) Too many users trying to use the same channel.
2) RF (Radio Frequency) interference from nearby WLANs
3) Improper wireless adapter settings
The first problem is a capacity issue, i.e. not enough bandwidth to go around. Simply put, there are too many radios trying to use the same channel (i.e. frequency) at the same time in the same area. “High density” is a relative term, but if you live in an apartment building or school dorm, you’re definitely in this category. And even if you live in a single-family dwelling, if the distance between your and your neighbors’ homes is 50 feet or so, and you know the names (SSIDs) of your neighbors’ wireless networks, you’re also in this category!
An 802.11g network has a best-case useable bandwidth of around 25Mbps. 802.11n can move this up to anywhere between 50 and 100 Mbps. But if any 11g clients are also actively using the same radio on an 802.11n router, throughput for both will be reduced by more than half.
Too Much Noise
The second cause falls into the category of RF-based interference. Though you might think of wireless LAN interference only in terms of 2.4GHz cordless phones and microwave ovens, WLAN equipment itself is becoming another growing – and perhaps dominant – category of RF “noise”.
Every form of communication has to deal with two components: signal, which is the part that contains the desired information; and noise, which is everything else. Key attributes of radio receiver design are maximizing sensitivity to signal and minimizing sensitivity to noise.
As long as Wi-Fi products receive sufficient signal, the Carrier Sense Multiple Access/Collision Avoidance (CSMA/CA) mechanism built into the protocol coordinates their communication. This access method – similar to CSMA/CD used in wired Ethernet – makes sure that only one product transmits at a time, so that the data is understood by all receivers.
But when the radio energy detected by a piece of WLAN gear can’t be understood – even if that energy comes from valid WLAN equipment – it turns into noise. Wireless LAN gear does a remarkable job of differentiating between signal and noise, but not all products are created equal in this area.
If you’re using 2.4 GHz band equipment, you probably know that your access point has eleven channels that it can be set to. You may not know, however, that only three of those channels should be used. The reason for this is illustrated in Figures 1 and 2.
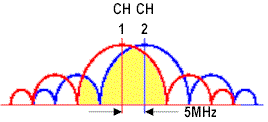
Figure 1: 2.4 GHz band adjacent channel overlap
The yellow shaded area in Figure 1 represents the power from channel 2’s signal that overlaps into channel 1’s main lobe (the largest “hump” and also the frequency band that contains most of the signal’s power). Since a significant amount of channel 2’s main lobe overlaps into channel 1’s main lobe (and vice versa), communication on both channels will suffer. (Note that this effect is the same for any two adjacent channels, not just Channels 1 and 2.)
Contrast this picture with the situation shown in Figure 2.

Figure 2: 2.4 GHz band “non-overlapping” channel overlap
This figure has the same scale as Figure 1, but shows signals in the “non-overlapping” channels 1, 6 and 11. Since the power from each signal doesn’t magically stop at the 22MHz 2.4 GHz band channel boundaries, there is still overlap between “non-overlapping” channels. But in this case, the yellow shaded area that represents channel 11’s power that is overlapping into the main lobe of channel 6 is at least 30 dB lower (1/1000) than channel 11’s peak power. For most well-designed radios, this 30dB difference between signal and “noise” is sufficient to ensure good rejection of the adjacent channels’ signals (i.e. noise).
Use of overlapping channels isn’t the only source of WLAN RF interference. As I’ll explain later (What Doesn’t Help), some of the techniques that your might be using to “ignore” other WLANs actually can hurt rather than help your own WLAN’s performance!
The take-away from all this is that not only do you have to deal with possible problems from microwave ovens and 2.4GHz phones, but neighboring WLANs themselves can also become interference sources.
Tip: Wireless networking management company Cirond argued that there are actually four channels (1, 4, 8, 11) that can be used for 802.11b and g with virtually no performance penalty. I recommend you stick with using Channels 1, 6, and 11 since they are more likely to be used by neighboring WLANs.
The third cause—incorrect settings—is just that. More on that topic later.
Change Channels
Now that you understand the primary mechanisms at work, you’re ready to move on to ways to combat them. A simple first step is to change your access point’s channel. Since Windows XP’s Wireless Zero Configuration utility is no help in determining the channels that neighboring wireless LANs are operating on, you’ll need to fire up the wireless client utility that came with your wireless adapter card.
NetStumbler used to be the go-to program for getting a clearer view of your wireless environment. But MetaGeek’s inSSIDer seems to have now taken the lead. It’s free, works with Windows XP, Vista and 7 (32 and 64-bit) and uses any wireless network card.
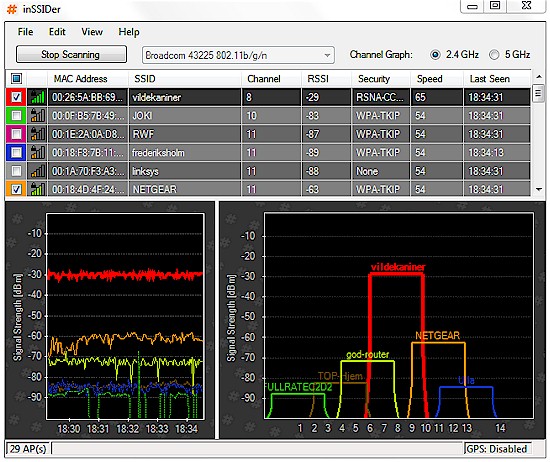
Figure 3: MetaGeek’s inSSIDer
One you know the lay of the airwaves, the countermeasure is simple. You’ll just need to choose a channel – 1, 6, or 11 – that is used by the fewest neighboring APs, has the lowest signal, is the least busy, or hopefully all three!
Changing channels is easy, but you have to know how to access your access point or wireless router’s setup screens (this info is in your product’s setup guide and user manual). As an example, Figure 4 shows the main Setup screen for the NETGEAR WNDR3700, with the yellow highlight indicating the SSID settings for the two radios.
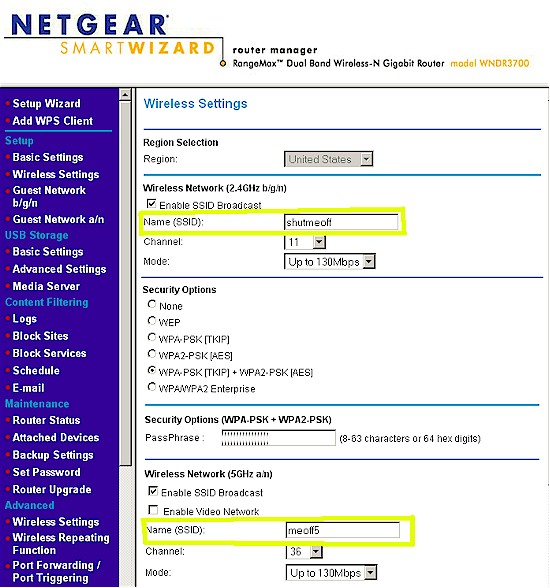
Figure 4: NETGEAR WNDR3700 wireless settings
You’ll probably want to change both settings – I’ll explain the how and why of the SSID setting later. Be sure to Apply, Save or whatever your product has you do to make the settings stick after you change them.
By the way, while client utilities can help you count APs and determine their operating channel, they won’t show you how busy each of those AP’s are, i.e. how many clients are associated to them. For that, you need a handy tool like my personal favorite – AirMagnet.
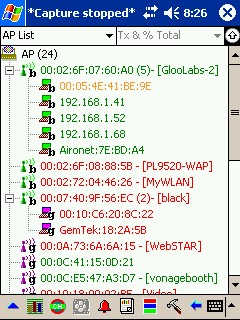
Figure 5: AirMagnet Handheld showing APs
Figure 5 shows just one of the many views that AirMagnet can provide of all in-range wireless equipment. This tree-type view shows access points (the little towers) and their associated clients (the little laptops). You can see that there are plenty of idle APs, and with a few stylus taps, AirMagnet can show the channel they’re operating on, too.
Unfortunately, AirMagnet and similar wireless LAN analysis tools are not intended for consumers and are priced accordingly ($3000 and up). If you’re handy with Linux, you can try Kismet, but otherwise you’ll have to make do with counting APs and looking at signal strength to guide you in your choice of new channel.
NOTE: Don’t bother trying to change the operating channel of your wireless client. The operating channel of Infrastructure-based wireless LANs (those that use access points or wireless routers) is determined by the AP, not the client. All you need to do is change the AP channel, and its associated clients will follow.
Duplicate SSIDs
Finding unused airspace will solve most neighboring LAN problems. But if that’s not an option (or you’ve tried it and you still need help), you might just need to tell your laptop to not go wandering and stay home!
In its zeal to make wireless networking as easy and automatic as possible, the default behavior of WinXP’s built-in Wireless Zero Configuration utility is very, well, promiscuous. Once you use it to successfully connect to a wireless LAN with a particular name (i.e. SSID), it automatically considers that a “preferred network” and will connect your wireless computer to it whenever it comes within range.
This convenient feature becomes a problem, however, in areas where there are multiple access points with the same name, but that are not part of the same network! As far as your wireless laptop is concerned, APs with the same name are part of the same network (this is how wireless LANs with multiple APs are set up, actually). Since your laptop has no way of knowing that those other APs with the same SSID as your AP are actually belong to your neighbors’ APs, it will at some point try to connect to them, usually when it detects an AP with a stronger signal.
But if your neighbor’s AP happens to have WEP or WPA encryption enabled, or is using MAC address filtering (association control), your laptop won’t be able to connect. What you’ll see is your wireless connection dropping, then (maybe) reconnecting to your own AP (you may have to rescan for networks and manually reconnect). You may think that your wireless network has gone haywire, but in truth, your laptop’s wireless card is just trying to do its job and keep you connected to the best signal available.
What makes this situation worse – by interfering with proper diagnosis of the problem – is that the Available Networks part of XP Zero Config doesn’t show multiple instances of the same network name (SSID). So unless you run the wireless client utility that came with your adapter and it shows every AP that it detects, you can only guess at what your wireless client is really seeing.
The good news is that Windows 7 seems to have addressed this issue and shows multiple instances of the same SSID. And many manufacturers have helped by having APs and wireless routers generate unique SSIDs, usually with part of the router’s MAC address concatenated with the manufacturer name.
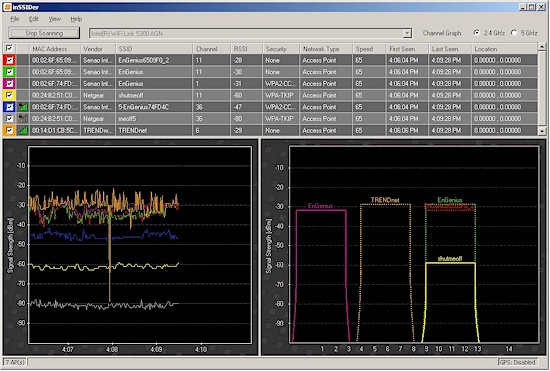
Figure 6 shows inSSIDer’s view of a few wireless routers that I just fired up. The only change I made was to set two of the SSIDs on one EnGenius dual-band concurrent router to “EnGenius”. I ran this scan from a notebook with an Intel WiFi Link 5300 dual-band N client card, so you can see SSIDs in both bands. InSSIDer found seven SSIDs, including the one duplicate.
Figure 6: Multiple APs viewed with inSSIDer
Figure 7 shows a Win 7 notebook’s view of the same set of SSIDs. While all SSIDs are shown, the display is less informative—you don’t even get channel information when you mouse over each connection.
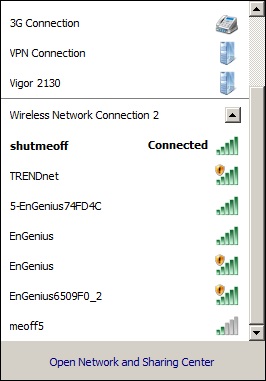
Figure 7: Same view with built-in Win 7 Wireless Utility
Finally, for those still using Windows XP, Figure 8 shows that you won’t see the duplicate SSID.
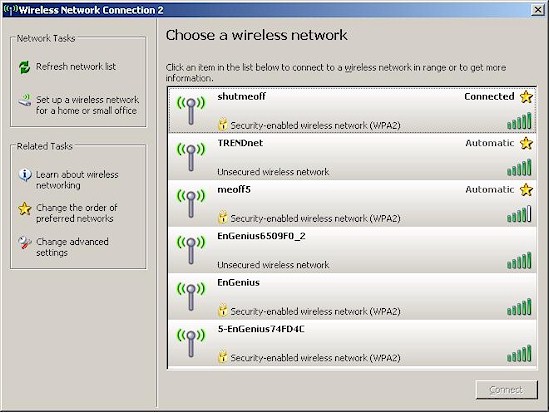
Figure 8: Same view with Win XP Wireless Zero Config
Making your client stay home
Fortunately there are two things you can do to keep your wireless clients on their own network. The first is to change your SSID from its default value and one not used by nearby WLANs. Choose something unique and that doesn’t divulge your name or location (for security’s sake). Using only letters, numbers, underscores and no spaces should give you plenty of options for the SSID name.
TIP: Some APs allow you to set an “AP Name”, which has nothing to do with its SSID, but is used to tell multiple APs apart for management purposes. So make sure you change your APs SSID (sometimes called ESSID).
The second step is to clear the Preferred Network list and make sure connection to non-preferred networks is disabled. Some wireless client utilities refer to this list as Profiles, but the concept is the same.
With XP, you’ll find the icon for your wireless adapter in the Network Connections window (Start > Settings > Network Connections). Right-clicking on the icon and selecting Properties should bring up a window similar to Figure 9.
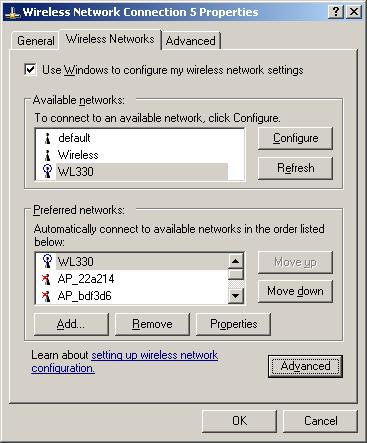
Figure 9: Too many “Preferred” networks
The upper portion of the window lists Available, i.e. currently detected, wireless networks while the lower section lists Preferred networks. Simply delete every network except yours by selecting them and clicking the Remove button. Then click the Advanced button to bring up that window, and make yours look like Figure 10.
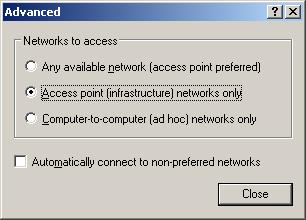
Figure 10: XP Advanced Wireless Network Properties
This will prevent your card from trying to connect to Ad-Hoc networks (in the unlikely event that any are around), but more importantly prevent automatic connection to any new wireless LANs that appear in your neighborhood.
TIP: If your wireless client is moved to another location where wireless LANs are present, you should repeat the Preferred Network clean-out when you return to your normal location.
For Win 7, the process looks different, but does the same thing. You first bring up the Network and Sharing Center (Figure 11), which you can do from the Network connection tray icon. I’ve highlighted the Manage wireless networks link that you need to click next.
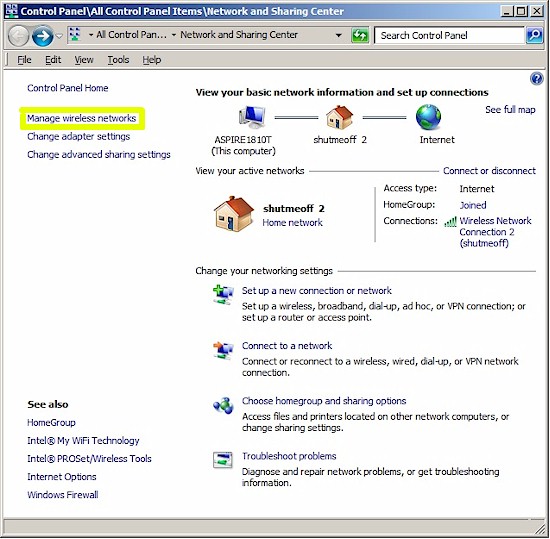
Figure 11: Windows 7 Network and Sharing Center
The Manage Wireless Networks window lets you set the network connection priority and add and delete wireless networks. Again, make sure that your network name is unique and at the top of this list. You might also want to delete all the other networks that may have made their way into this list. You definitely want to delete any networks that are the same as any in-range SSID’s that you can see!
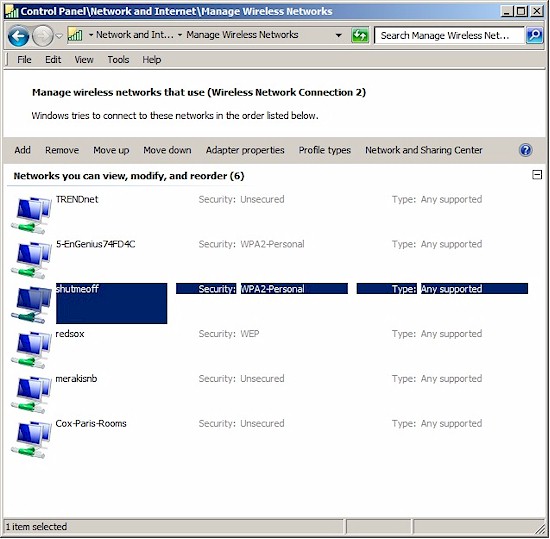
Figure 12: Windows 7 Manage Wireless Networks
To reach other wireless controls in Win 7, you need to get to the Wireless Connection Status window. You can do this by clicking the network connection icon in the tray, right-clicking the currently-connected network and choosing Status to bring up a window like the one in Figure 13.
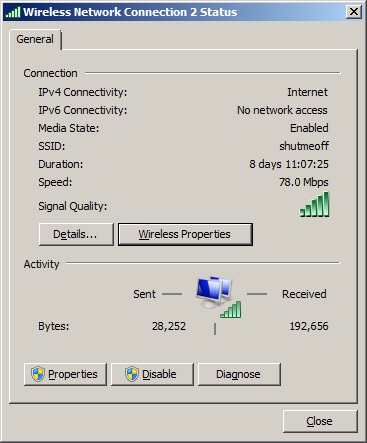
Figure 13: Windows 7 Wireless Connection Status
Clicking the Wireless Properties button will bring up the window shown in Figure 14.
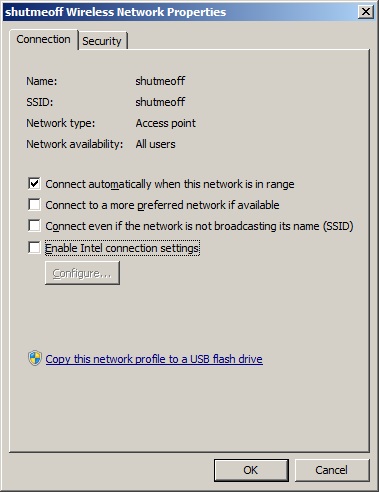
Figure 14: Windows 7 Wireless Network properties
The Connect automatically… box shown checked in Figure 14 should be checked only for the network you want to connect to. If it’s checked on other wireless networks that you want to keep around (Manage Wireless Networks – Figure 12) for when you travel or take your notebook to the office, that fine, as long as that network doesn’t have the same name as any in-range networks!
If you’re using your wireless adapter’s client utility, check to see if has a similar “preferred network” capability, and perform a similar clean-out if possible. Some utilities use “connection profiles”, which store all the settings for connecting to a particular WLAN and require you to manually switch among them. You shouldn’t have to perform a “clean-out” in this case, but you may need to delete unwanted profiles if your client utility automatically creates them when it detects new networks and automatically switches among them.
Other Adapter Settings
If you’re on a battery-powered device, you probably know how fast it can suck down a battery. But wireless adapters can be adjusted to use less power, mostly by shutting off their transceivers for longer periods of time. This is called powersaving mode (PS).
Successful PS requires coordination by both the AP and STA (client). APs must know the power management state of all connected STAs and save frames for STAs that are in PS. They must also, however, periodically announce stations that have frames waiting for them. Mattew Gast’s 802.11 Wireless Networks: The Definitive Guide, my go-to reference for all things 802.11, has a complete explanation in Chapter 8: Power Management in Infrastructure Networks, which you can view via Google books.
But sometimes the coordination doesn’t work well, which can lead to APs and STAs losing connection. To fix this, you may need to set your wireless adapter to stay awake longer or not use PS mode at all.
Unfortunately, you may have to hunt around for the settings. First stop is your wireless client adapter’s properties, where you may find a power saving mode setting among the Advanced properties. Win 7 “helpfully” moves these settings to the Power Options Control Panel, but then buries them a few levels down.
You’ll need to bring up the Power Options Control Panel, then the click the Change Plan Settings link for the currently-selected power plan to bring up the screen in Figure 15. Then click the Change advanced power settings link I’ve highlighted.
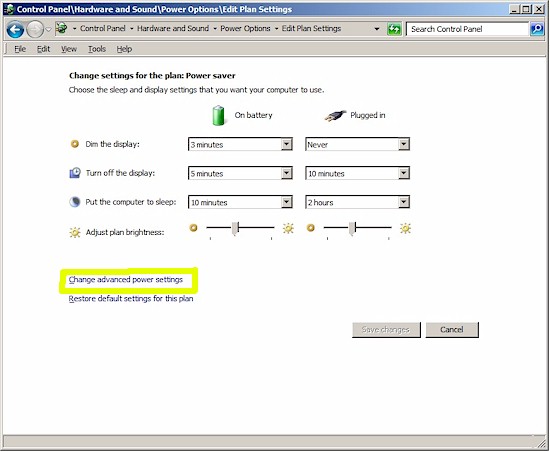
Figure 15: Windows 7 Edit Power Plan settings
That will finally bring you to the Power Options Advanced Setting window. Scroll until you find Wireless Adapter Settings as shown in Figure 16 and change the option to Maximum Performance if it already isn’t. Make sure you change the option for both On battery and Plugged In modes. It’s probably a good idea to reboot both the computer and the wireless router after making the change to make sure that old state information gets cleared out.
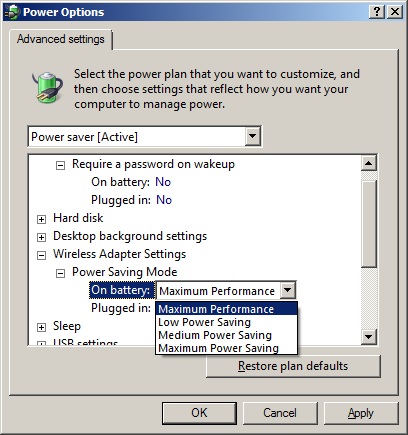
Figure 16: Changing Wireless Adapter Power settings in Win 7
If this fixes the problem, but shortens your battery life too much, you can then try backing off the settings to Low Power Saving, Medium Power Saving, etc.
Survey the possibilities
If you can’t find a clear channel and still have problems after locking your clients down so that they don’t go straying to other WLANs, it’s time to see if you can do something about all the unwanted signals bombarding your poor little WLAN, i.e. reduce the RF noise. This is an area where understanding the problem is especially important before implementing a solution and that means you’ll need something to measure signal strength to help you perform a site survey.
A “site survey” is just a fancy term for walking around with something that can measure wireless signal strength and recording what you see. You can do this with your wireless laptop, provided that its client application has the ability to show all in-range APs, their channels and some indication of signal strength.
It doesn’t matter whether the signal indicator reads in %, dBm, or no units at all, or whether it measures signal strength, signal quality or both, since you’ll be looking mainly for changes in whatever indicator you use. It’s also helpful if the client utility has a fast-responding, real-time signal indicator for the AP that it’s connected to, and even better if it can plot the signal strength over time.
Once again, inSSIDer comes to the rescue providing both numerical RSSI readings and nice plots of in-range networks.
Once you have your signal measurement tool, take it to your problem location(s) and see what it can see. Since you’ve already addressed the SSID-related problems (right?), you’re mainly looking for the signal levels and channels of neighboring APs. The APs most likely to be causing you grief are those on the same or nearby channels and with signal levels greater than or equal to that of your own AP.
Folks who use channels other than 1, 6 and 11, thinking that they are outsmarting the crowd actually hurt both themselves and neighboring networks. More on this in the “What Doesn’t Help” section.
Sometimes, though, the problem isn’t wireless networks, but non-WiFi signals in the same band. Other things that use the 2.4 GHz band are wireless cameras, baby monitors, cordless phones and microwave ovens. Note that some “5.8 GHz” phones actually also use the 2.4 GHz band! The only Wi-Fi safe phones are DECT (for non-US users) or DECT 6.0 (for US) based. They use a frequency band outside the Wi-Fi 2.4 GHz band, so can’t interfere.
These things won’t show up using a site survey tool that can interpret only Wi-Fi signals. To see non-WiFi RF, you need a spectrum analysis tool like MetaGeek’s $99 Wi-spy 2.4i. This very handy tool covers only the 2.4 GHz band. But that’s where most problems lie anyway. If you do perform a spectrum analysis make sure that you run the analysis over a long enough period, especially if your problem is intermittent!
Once you understand the wireless environment your client is operating in, you’re ready to take steps to change it.
But my general advice is to focus on solutions that reduce interference from neighboring WLANs vs. boosting your own signal and creating a problem for someone else. Many times a little aluminum screening, intelligent use of directional antennas and just relocating your AP can go a long way.
5 GHz
Sometimes, it’s just time to move on. If your efforts at battling 2.4 GHz band interference are proving to be futile, consider moving to the quieter 5 GHz band. This is much easier now than when 802.11a was the only 5 GHz option.
Single radio dual-band 802.11n routers allow you to operate in either band and simultaneous dual-band routers can support clients in both bands at the same time because they have two radios.
The downside of moving to 5 GHz is that your wireless network won’t reach as far as it does when set to use the 2.4 GHz band. The other negative is that you’ll need to switch to dual-band adapters in order to use the 5 GHz band.
If you can live with these tradeoffs (or set up a multiple-AP WLAN), this might be the way to go for you.
Social Engineering
As much as you may hate to admit it, you may not be able to solve your wireless problems by yourself. Since the heart of the problem is caused by lack of coordination (and communication) among users trying to run a number of wireless LANs in too small an area, the most effective solution would be to apply the design techniques used in large multi-AP WLANs.
You may be surprised at the willingness of people to work together to solve a common problem—especially if they don’t really have to do much. Put up a sign and call a meeting of your apartment building, dorm, or neighborhood. If you’ve got the a WLAN problem, chances are others do too.
Once you’ve got the interested parties together, the main order of business is to see if you can work out a satisfactory channel assignment scheme. If there are only three APs involved, the job is pretty simple. But if you’re dealing with more APs, you’ll have to put in a more effort.
Make a diagram of the APs as close to scale as you can get it. Once you have the APs located, it’s just a matter of juggling channel assignments so that APs using the same channels have the lowest signal strength with respect to each other. Since signal strength is primarily related to distance, a practical approximation of this rule is to locate same-channel APs as far apart as possible.
In some cases, building construction and other RF-unfriendly obstacles like trees, water, screens, etc. may allow you to bend this “farthest-distance” rule a bit. In multi-story situations, be sure to think in three dimensions because radio waves travel in all directions!
Once you have your channels assigned, but sure to assign unique SSIDs to each AP. Though you want to treat the APs as one big WLAN from a channel assignment point of view, you still want multiple, separate WLANs from an operational point of view. Unique SSIDs will keep clients from trying to roam where they’re unwanted.
Finally, if you find that your neighbors are unfamiliar with the wonders of WEP / WPA, MAC address association control (filtering) and other WLAN security features, help them get that set up too. With the problem of wireless-security throughput essentially gone from current-generation WLAN equipment, there’s no reason to run wide-open WLANs if you don’t want to.
Use WPA2 / AES security with a strong password if you can, i.e. all your devices support it. You especially want to use WPA2 / AES if you’re running 802.11n gear, since you’ll get only 802.11g speeds (54 Mbps maximum link rate, around 20 Mbps best-case real throughput) if you use WEP or WPA / TKIP.
What Doesn’t Help
When faced with a wireless LAN that won’t behave, people will try most anything in search of a cure. But some “solutions” don’t really help and can actually hurt your (and your neighbors’) WLANs performance. Let’s look at some “solutions” commonly suggested.
Turning on WEP, WPA, WPA2 / Using authentication
Encryption methods such as WEP and WPA or using one of the many 802.1x authentication methods will keep unwanted clients from associating with your wireless LAN, but not from trying! Preventing association keeps clients from using significant amounts of your WLAN’s bandwidth, but association attempts – especially in areas with many wireless clients – can still cause performance to degrade.
Put another way, use of encryption doesn’t do anything to the radio signal itself, but only to the information it is carrying. So while I recommend enabling WPA2 for security reasons, it doesn’t do anything to reduce the effect of too many radios in too small a space.
Turning off SSID broadcast
It’s not the security precaution that some articles make it out to be, and it won’t really help keep your clients from trying to associate with other wireless LANs. But turning off the broadcast of your AP’s SSID could help your neighbors’ clients to stay on their own WLAN. But again, change your default SSID, too, because if your neighbor’s laptop detected and saved it in its “Preferred network” list at some point, it will still look for it during its association attempts.
Selecting 11g-only or 11n-only mode; Disabling “protection”
Owners of 802.11g and N APs may have a few other knobs to fiddle with, depending on the controls they expose. Some APs allow disabling of the 802.11b “Protection” mechanism that enables slower 11b clients to interoperate with faster 11g APs. And 11n routers have similar controls that control backward-compatibility features for 11g.
The only thing shutting off these protection mechanisms will do, however, is negatively affect the performance of your WLAN. If your AP can’t “hear” your slower clients that are trying to communicate with it, they won’t be able to connect. And the clients will still be generating traffic as they constantly try to seek out an AP to associate with.
Boosting your signal
Signal boosting at best solves half the problem, since it can only help a client to “hear” an AP better and not vice-versa. Though I have to admit that boosting might help keep your client from straying by providing a stronger signal to latch onto, I would use this only as a last resort. Solving a problem by passing it on to someone else (your neighbor) isn’t really a solution.
Using Channel Bonding
Atheros’ Super-G was the first bandwidth-hogging “channel bonding” technique, and 802.11n has 40 MHz mode baked into the standard. Neither should be used in crowded 2.4 GHz band WiFi environments because there simply isn’t enough available bandwidth.
While you may think that you are drowning out neighboring WLANs, you’re just raising the RF noise level, causing problems for everyone. Leave your N router’s defaults alone and use only 20 MHz bandwidth mode in 2.4 GHz.
Using Channels other than 1, 6 and 11 in 2.4 GHz
Let’s bring back an earlier picture to show why this doesn’t help.

Figure 17: 2.4 GHz band adjacent channel overlap – again
If you’re using Channel 1 and your neighbor is using Channel 2, you’re both putting plenty of power into each other’s channel. Even the best receivers have difficulty dealing with this level of “adjacent channel interference”. Whatever a receiver can’t understand, ends up as “noise”, which can reduce performance.
On the other hand, when both your WLANs use the same channel, the CSMA/CA mechanism described earlier, as well as other Wi-Fi coordination techniques, can operate as intended. Although you both will be contending for a share of the same spectrum (and bandwidth), your requests can be coordinated for most efficient sharing. In other words, you may not get the speed you want, but you’ll get reliable operation.
Closing Thoughts
The 802.11 protocol at the heart of Wi-Fi is amazingly robust and capable of supporting dozens, if not hundreds of stations in a given area. The key to successful operation, however, is cooperation, not competition.
The old saw of “thinking globally, and acting locally” really is the best approach to having multiple wireless LANs operate successfully. Now that you know how, get out there and lead your wireless neighborhood to wireless networking harmony! and Geek on 🙂
Got a project that needs expert IT support?
From Linux and Microsoft Server to VMware, networking, and more, our team at CR Tech is here to help.
Get personalized support today and ensure your systems are running at peak performance or make sure that your project turns out to be a successful one!
CONTACT US NOW

