Configuring the Network Policy Server
The first step in the configuration process is to make the Network Policy Server aware of your wireless access point. To do so, make sure that the NPS (Local) container is still selected and then choose the RADIUS Server for 802.1x Wireless or Wired Connections option from the drop down menu, as shown in Figure A.
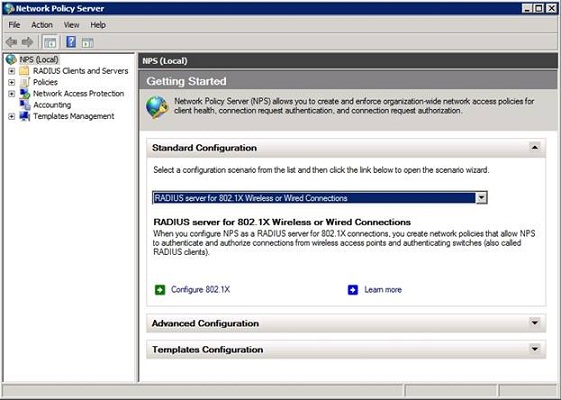
Figure A: Choose the RADIUS Server for 802.1x Wireless or Wired Connections option from the drop down menu.
Now, click the Configure 802.1x button. The following screen will ask you to provide the type of 802.1x connections that you want to use. Select the Secure Wireless Connections option and then provide a name for the policies that will be created, as shown in Figure B.
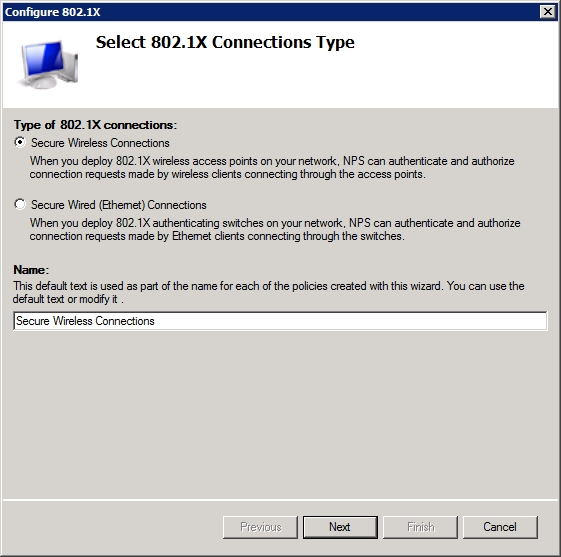
Figure B: Provide a name for the policies that you are creating.
Click Next, and the wizard will ask you to provide a list of RADIUS clients. In this case the RADIUS client is going to be your wireless access point. Therefore, click the Add button and then provide a friendly name and the IP address of your access point, as shown in Figure C.
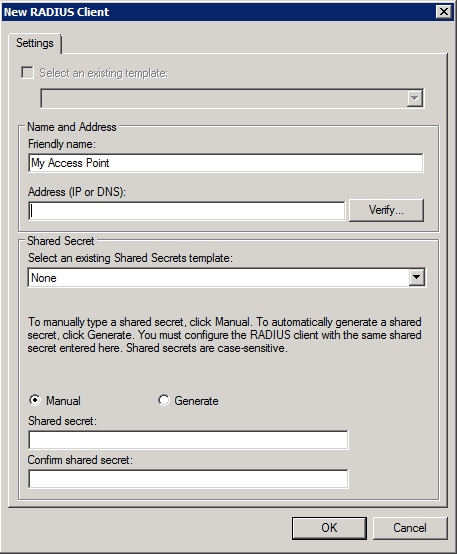
Figure C: Provide a friendly name for your wireless access point.
Now, enter your wireless access point’s IP address (or DNS name) into the space provided and click the Verify button. If you enter an IP address you will see a dialog box asking you to verify the address. To verify the address simply double check to make sure that you have typed the address correctly and then click the Resolve button. When the IP address is resolved, select the address from the list of addresses in the lower portion of the dialog box and click OK.
Now, you must provide Windows with a shared secret for your access point. If your access point is already configured with a shared secret you should choose the Manual option as shown in the figure above and then enter and confirm your shared secret. Otherwise, you can choose to have Windows to automatically generate a shared secret for you.
If Windows generates the shared secret then you will need to enter the shared secret into the wireless access point. The easiest way to do this is to copy and paste the shared secret from Windows directly into the access point’s Web interface. As I mentioned at the end of the previous article however, Windows can sometimes generate a shared secret that exceeds the maximum length that is supported by an access point. Therefore, it is critical that you verify the maximum shared secret length that is supported by your access point and make any necessary adjustments. Regardless of whether you enter a shared secret manually or have Windows to generate a shared secret for you, it is important to remember that shared secrets are case sensitive.
Click OK and you should see your access point’s friendly name added to the list of RADIUS clients. Click Next, and Windows will prompt you to specify the EAP type for the policy that you are creating. Choose the Microsoft Protected EAP (PEAP) option from the list, as shown in Figure D.
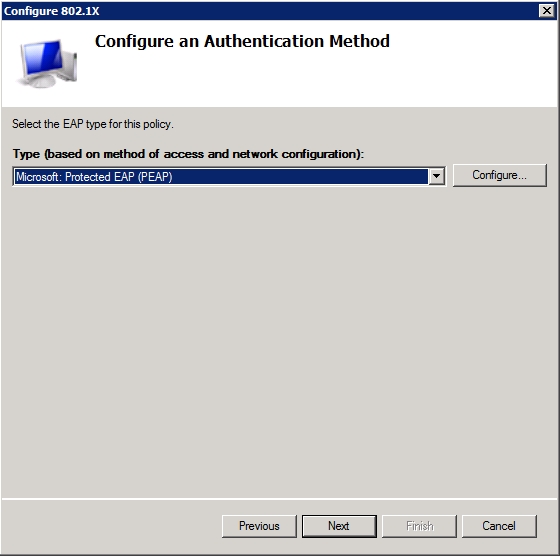
Figure D: Configure the policy to use Microsoft Protected EAP (PEAP).
Now, click the Configure button that is shown in the figure above. If you receive an error message then make sure that you have performed the certificate enrollment correctly. Certificate enrollment was covered in the previous article.
You should now see the Edit Protected EAP Properties dialog box, which is shown in Figure E. Take a moment to make sure that the Certificate Issued drop down list is displaying the correct certificate. You should also make sure that Enable Fast Reconnect is enabled and that the EAP Types list only contains Secured Password (EAP-MSCHAP V2).
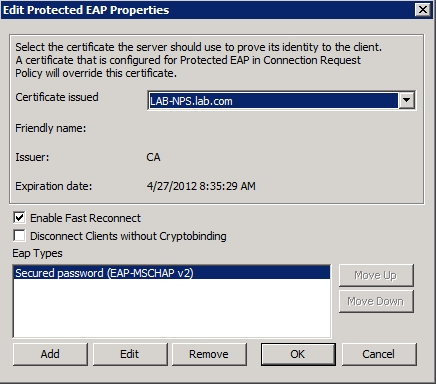
Figure E: Make sure that the correct certificate is being used.
Click OK, followed by Next. You will now see a screen asking you to select the groups that you want to associate with this policy. Although the dialog box text is a bit vague, it is essentially asking who you want to allow to access the network through the wireless connection. You will need to specify both the users and the computers to whom you want to provide access. You can create specialized groups if you like, or if you prefer to open the connection up to all Active Directory members you can use the Domain Users group and the Domain Computers group as shown in Figure F.
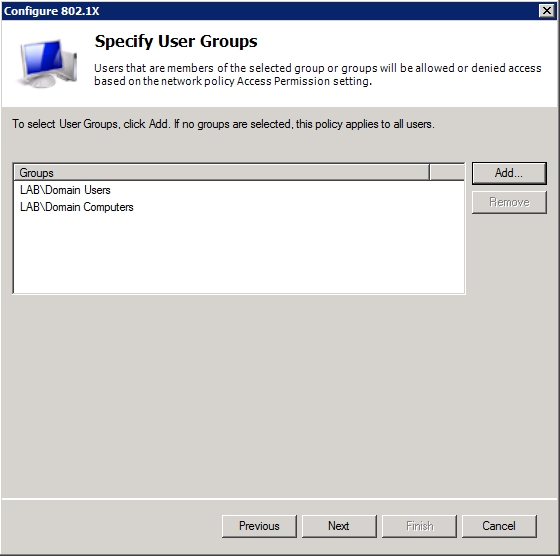
Figure F: Specify the groups that should be allowed to use the wireless connection.
The next screen asks you if your wireless access point uses traffic controls. If you want to configure traffic controls then you can do so by clicking the Configure button. Otherwise, just click Next.
You should now see a screen telling you that you have successfully created the wireless access policy and configured the RADIUS client (which again, is your wireless access point). Take just a moment to review the information that is presented on this screen to ensure that everything is correct, and then click Finish.
Configuring Your Wireless Access Point
Now that you have configured the Network Policy Server, the next step in the process is to configure your wireless access point to interact with the newly created Network Policy Server. Unfortunately, I can’t give you specific step by step instructions for this part of the procedure because every make and model of wireless access point is different. I will however, try to give you a general idea of what needs to be done.
Assuming that you are using a brand new wireless access point that has not yet been configured, the first thing that you will need to do after connecting to the access point’s Web interface is to set the access point’s IP address to match the address that you provided to the network policy server (unless you set the network policy server to use the access point’s default address).
Next, specify an SSID for your wireless access point (assuming that you want to use one). When you are done, it is time to enable encryption. You should set the access point to use AES encryption with a shared secret (this is sometimes referred to as AES Enterprise). Finally, set the access point to use the same shared secret as the Network Policy Server.
Conclusion
Now that the Network Policy Server is configured, we need to configure our wireless client computers to use it. In Part 9, I will conclude the series by discussing client connectivity.
Got a project that needs expert IT support?
From Linux and Microsoft Server to VMware, networking, and more, our team at CR Tech is here to help.
Get personalized support today and ensure your systems are running at peak performance or make sure that your project turns out to be a successful one!
CONTACT US NOW

