

Prerequisites
You’ll need the following in-place already.
- An existing Azure Storage Account
- A custom domain (and SSL certificate) ready to use
- You must be registered to use the preview basic-tier Application Gateway – Deploy Application Gateway Basic (Preview) – Azure Application Gateway | Microsoft Learn
Step 1 – Create the Application Gateway
Here’s how to configure the Application Gateway to use a custom domain and establish HTTPS communication with the Storage Account.
Create the Application Gateway
- In the Azure Portal, select Create a resource.
- Search for an select the Application Gateway resource.
- Select the Subscription and Resource Group where the App Gateway will be hosted.
- Provide a descriptive name and select the same Region as the Storage Account.
- Choose the Basic Tier to minimise costs, although any tier should work.
- Select or create a Virtual network and Subnet to host the App Gateway. This will be used to limit access directly to the Storage Account later.
- Under the Frontends stage, select an existing Public IP or create one.
- Under the Backends stage, select Add a backend pool, then provide a descriptive name and enter the FQDN of your Storage Account.
- In my case this is “testingstorage32565.blob.core.windows.net“.
- Navigate to the Configuration stage and select Add a routing rule.
There’s quite a bit we need to do here, so let’s break it down to make sure it’s understandable.
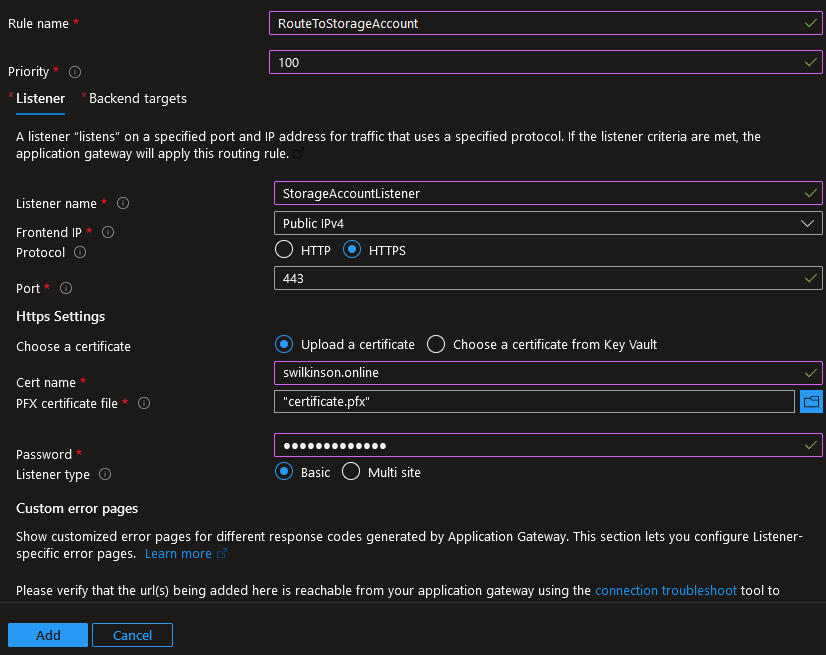
Add a Routing Rule
- Provide a descriptive Rule name, and select a Priority, 100 is a good default unless you need otherwise.
- Configure the Listener, which “listens” for traffic on a given port and IP address and which we’ll use to redirect traffic from the App Gateway to the Storage Account.
- Provide a descriptive Listener name
- Select HTTPS as the Frontend IP Protocol to ensure end-to-end encryption.
- Upload a certificate which covers the domain name we’ll use for the Application Gateway itself or select an existing Certificate from a Key Vault. Eg storage.swilkinson.online
- Next, configure the Backend targets by selecting the tab at the top of the Add a routing table prompt.
- Select the Backend target you created earlier.
- Select Add new and create a new Backend Setting, ensuring you follow the steps outlined in the “Add a Backend Setting” section below.
- Once that’s all configured, click Add to finish configuring the routing rule.
- Continue through the configuration wizard and select Create to create the Application Gateway.
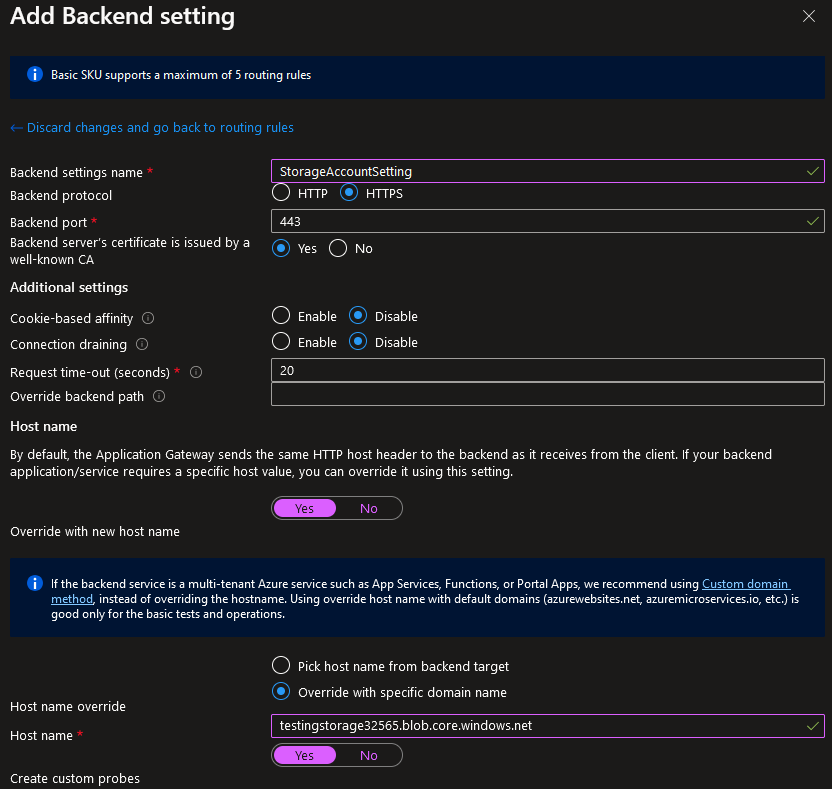
Add a Backend Setting
These steps should be configured as part of the Add a Routing Rule section above but may also be used as a reference.
- Provide a descriptive Backend setting name.
- Select HTTPS as the Backend protocol to ensure End-to-End Encryption.
- Set “Backend server’s certificate is issued by a well-known CA” to Yes.
- Set “Override with new host name” to Yes.
- Select Override with specific domain name under the Host name override section.
- Set the Host name to the host name of the Storage Account. In my case this is “testingstorage32565.blob.core.windows.net“. If this is not done correctly, you will receive a “The request URI is invalid” error when trying to connect.
- Select Yes to “Create custom probes”, then select Add to create the setting.
Note: The Basic-tier Application Gateway only allows you to configure up to 5 backend pool targets and 5 routing rules.
Step 2 – Configure the Created Application Gateway
The Basic-tier Application gateway can take some time to provision, once created, navigate to it as there’s some additional configuration we need to do before it’ll work as expected.
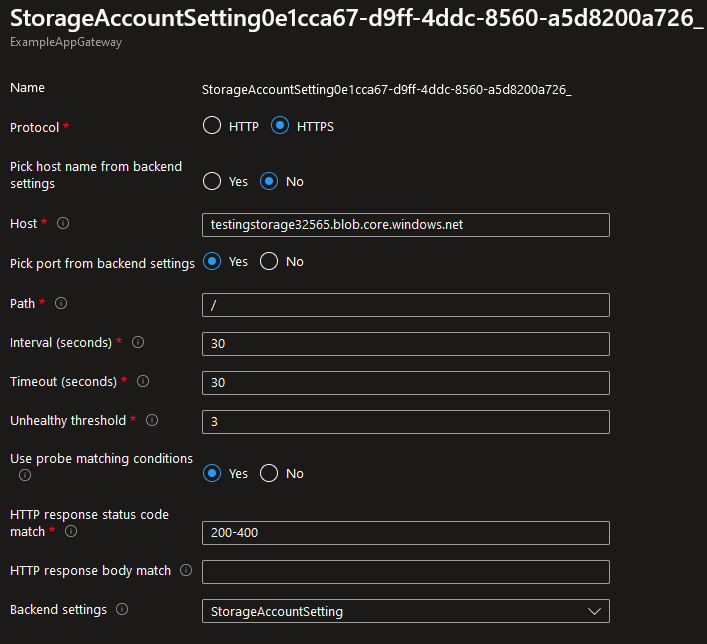
Modify the Custom Health Probe
For the routing to work correctly, we must modify the Health probe that was created to update the status code match since the Storage Account returns a 400 HTTP code in this case.
- Navigate to Health probes under Settings and select the only configured probe.
- Update the HTTP response status code match to 200-400 instead of the default 200-399 value.
- Optionally, uncheck “I want to test the backend health before adding the health probe” if your Storage Account is not currently accessible to the Application Gateway.
- Select Test or Save.
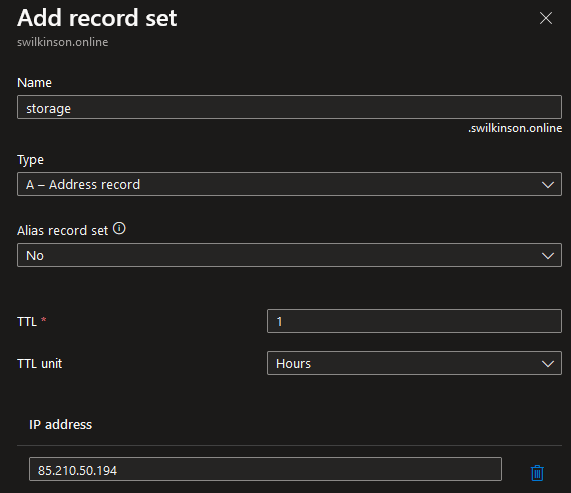
Step 3 – Map a DNS Record
Now that we’ve configured the Web Application, we now need to map a domain name to the public IP of the Application Gateway. This can be any valid domain covered by the SSL Certificate you configured earlier.
Advertisement
The DNS record should be an A type DNS record.
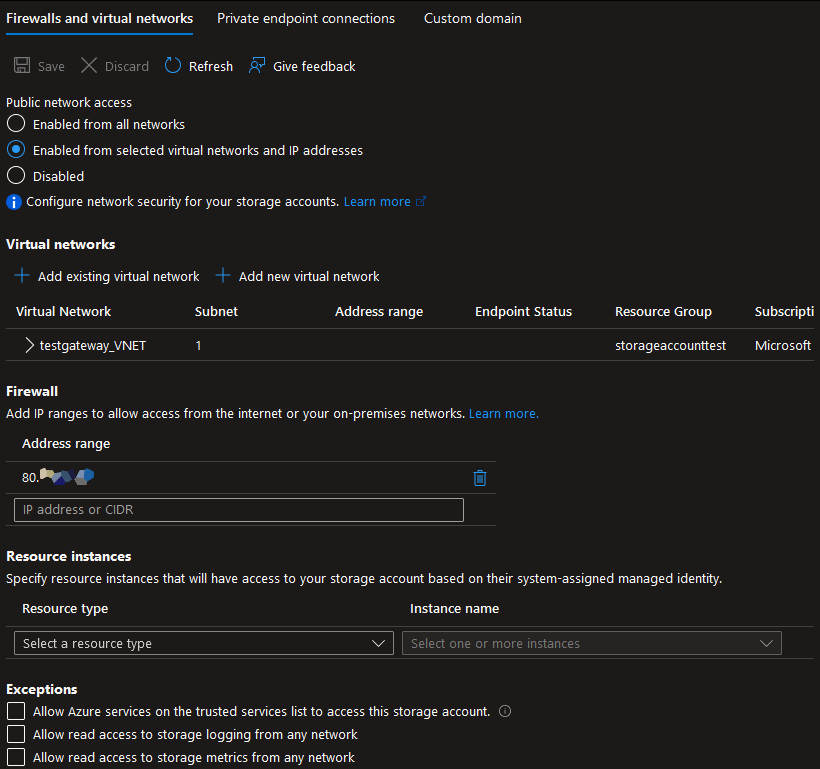
Step 4 – Lock Down Storage Account Access
By default, Storage Accounts allow public network access. To ensure that traffic only flows through the Application Gateway, you’ll need to lock down the Storage Account’s network access.
- Navigate to the Storage Account you’ve configured.
- Go to the Networking blade.
- Under Public Network Access, select Enabled from selected virtual networks and IP addresses.
- Add your Application Gateway’s subnet under the Virtual Networks section, and also add any specific IP addresses if needed.
- This setting ensures that only traffic routed through the Application Gateway (and the configured IPs) can reach your Storage Account.
To manage the Storage Account using the Azure portal (e.g., via the Storage Browser), you need to whitelist your public IP address.
Step 5 – Final Security Check
Ensure that the Storage Account’s direct URL (yourstorageaccount.blob.core.windows.net) is not accessible from any public IP. Only traffic coming through the Application Gateway should be able to access it.
You can test this by trying to access the Storage Account URL directly from a machine not in the allowed IP address range or virtual network. The request should be denied, confirming that your security settings are working as intended.
Wrapping Up
At this point, all going well you will have a fully secured Application Gateway fronting your Storage Account, which is configured to ensure End-to-End Encryption and which is configured to be as cost effective as possible.
Got a project that needs expert IT support?
From Linux and Microsoft Server to VMware, networking, and more, our team at CR Tech is here to help.
Get personalized support today and ensure your systems are running at peak performance or make sure that your project turns out to be a successful one!
CONTACT US NOW