

What is Lifecycle Management?
Lifecycle Management allows you to set policies that automate the movement of your data between access tiers or delete data when it’s no longer needed. This can reduce costs by ensuring that you’re only paying for high-performance storage when necessary and moving older, infrequently accessed data to cheaper tiers.
Automating this process saves time and ensures you aren’t overpaying for storage.
Understanding Storage Tiers
There are 3 Storage Tiers available to Storage Accounts, changing between them is critical to reducing your storage costs:
- Hot Tier: Optimized for data that’s accessed frequently. It has higher storage costs but lower access costs, making it ideal for actively used data or real-time applications.
- Cool Tier: Best for infrequently accessed data, such as backups or data that is accessed less than once a month. Storage costs are lower, but retrieval costs are higher compared to the Hot tier.
- Cold Tier: Best for rarely access data which still requires fast retrieval, Cold tier has even lower storage costs than Cool tier but higher access costs.
- Archive Tier: Designed for rarely accessed data, the Archive tier offers the lowest storage cost, but data retrieval can take hours and can be very expensive.
How to Set Up Lifecycle Management
Step 1: Navigate to Your Storage Account
Navigate to “Storage Accounts” and select the storage account where you want to implement lifecycle management.
Advertisement
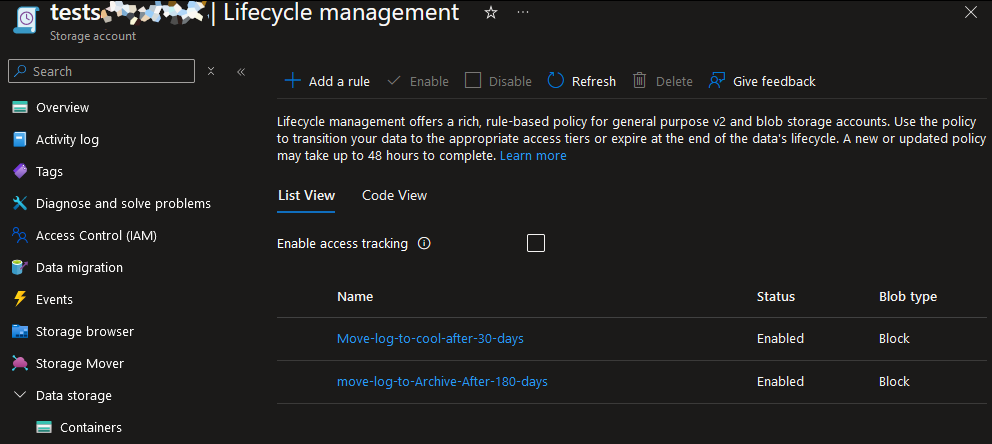
Step 2: Access Lifecycle Management
Once inside the storage account, navigate to the “Data management” section and click on “Lifecycle management”. This is where you can create rules for moving or deleting data based on its age or last access date.
Step 3: Create a New Lifecycle Rule
Here’s how to create a rule:
- Select Add to navigate to the Add a rule page.
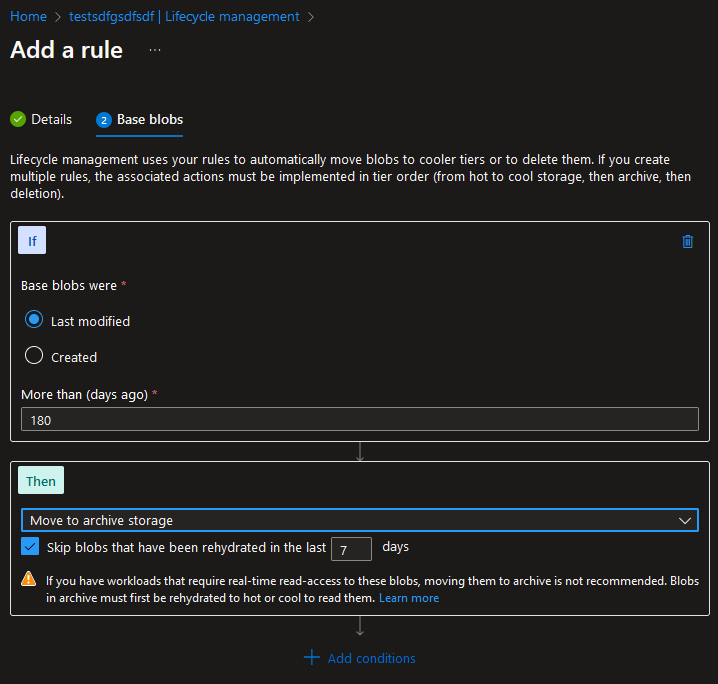
- Enter a descriptive Rule name, optionally limit the Rules scope to either apply to all blobs or just to specific blobs using dynamic filters and select the type and subtype of blobs
- On the Base blobs page, configure whether to move blobs based on when they were last modified or their creation fate, and enter a value. Then choose which tier to move matching blobs to or whether to delete the blob.
- Finally, enter a Blob prefix and index matching rules if you decided to limit the scope.
By implementing rules, you can ensure that data is automatically managed across tiers without manual intervention, resulting in lower storage costs over time.
Best Practices for Lifecycle Management
Analyze Data Access Patterns
It’s important to understand how your data is being used before you can effectively set up Lifecycle Management. For example, frequently accessed data should remain in the Hot tier to reduce access costs, whereas less frequently accessed data can be moved to the Cool, Cold or Archive tiers.
Use Tier Transitions Wisely
Don’t rush to move data into lower-cost tiers too quickly. For example, if you anticipate needing quick access to recently archived data, it might be better to leave it in the Cool tier for a while.
Regularly Review Policies
As your business and data usage changes, so should your lifecycle management policies. Regularly reviewing and adjusting your policies ensures that they remain optimized for your current requirements.
Azure Storage Blob Reservations
Blob Storage Reservations offer significant cost savings. By committing to a certain amount of storage capacity for one or three years, you can save up to 38% over pay-as-you-go pricing.
Choose Redundancy Levels Carefully
Azure offers different redundancy levels, such as Locally Redundant Storage (LRS), Geo-Redundant Storage (GRS), and Read-Access Geo-Redundant Storage (RA-GRS). While these provide added protection, they come at a higher cost. For data that isn’t mission-critical, consider using LRS, which is the cheapest redundancy option.
Optimize Data Transfer and Egress Costs
Data egress (data leaving Azure) can be costly, especially if you frequently transfer data out of your storage accounts. Consider using Azure ExpressRoutes to reduce and/or remove your bandwidth costs..
Data Retention Regulations
For businesses that have to comply with strict data retention regulations (e.g., healthcare, financial services), balancing cost with compliance can be a difficult challenge. The key is often to ensure you have a very clear view of what data must be quickly accessed, and to ensure you’re configuring aggressive archiving to cool or ideally the Archive tier where possible.
- Implement Retention Policies: You can configure policies that automatically retain data in Azure for a certain period, even while it’s moved to cheaper storage tiers such as Archive.
- Long-Term Archival Strategies: Use the Archive Tier for long-term storage requirements, ensuring that data is available for compliance purposes but at the lowest possible cost. Be wary of being overly aggressive when moving to Archive Tier, as restore costs are very high and data can take a long time to restore.
Got a project that needs expert IT support?
From Linux and Microsoft Server to VMware, networking, and more, our team at CR Tech is here to help.
Get personalized support today and ensure your systems are running at peak performance or make sure that your project turns out to be a successful one!
CONTACT US NOW