As the name suggests, a shared mailbox is one that is used by multiple users to receive or send email. You’ve probably seen shared mailboxes used for situations such as an IT help desk, a HR department, payroll enquiries, and reception desks.
A shared mailbox also has a calendar, so they can be used to coordinate team schedules or anything else where multiple people may need to look at a common calendar (except for meeting rooms which should use a room mailbox, and pool equipment which should use an equipment mailbox).
Shared mailboxes do not consume an Office 365 license, and they can’t be logged into directly. This is a good thing, since most organizations would not want to pay for extra licenses for shared mailboxes, but it means they are not a way to get a “free” license for generic/shared user accounts (eg a shared “reception” account).
The licensing point is important, because in a staged or cutover Office 365 migration you will end up with mailboxes that were shared mailbox on-premises being migrated as regular user mailboxes into Exchange Online. User mailboxes will work without a license for 30 days after which they will be deleted. Fortunately you can convert them from a user mailbox to a shared mailbox without assigning a license, which I’ll cover later in this article.
But first, let’s look at creating new shared mailboxes in Exchange Online (Office 365).
CREATING NEW SHARED MAILBOXES IN EXCHANGE ONLINE
There are three methods you can use to create new shared mailboxes in Exchange Online:
- Office 365 admin center
- Exchange admin center
- PowerShell
CREATING A SHARED MAILBOX IN THE OFFICE 365 ADMIN CENTER
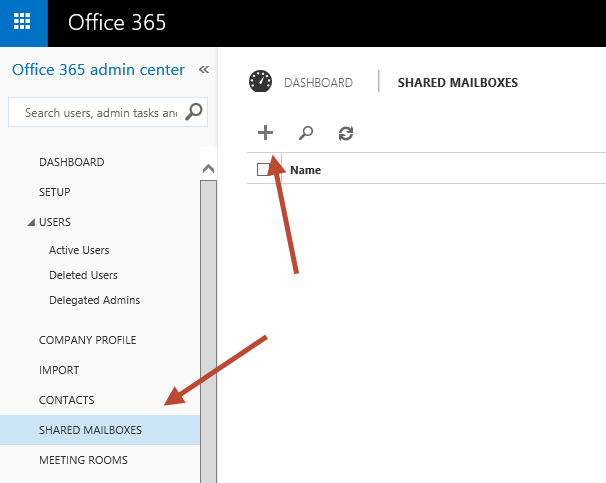
The Office 365 admin center is located at https://portal.office.com. After logging in look for the Shared Mailboxes item in the left menu. Click the + icon to create a new shared mailbox.
Give the new shared mailbox a name and email address, and choose one or more users who need access to open and send as the shared mailbox.
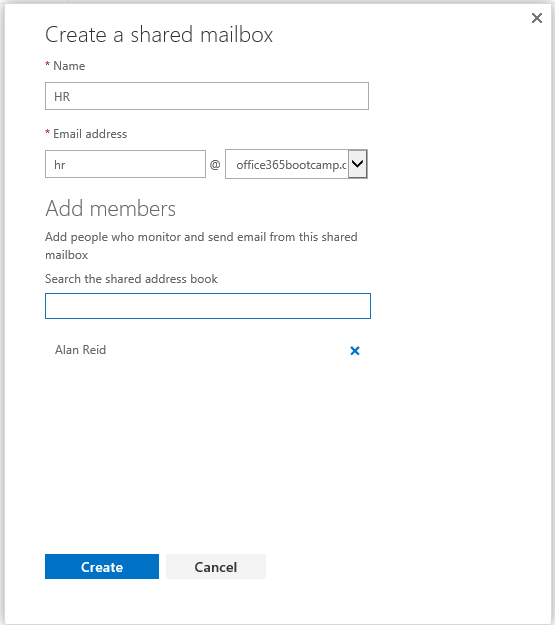
Click Create to complete the task.
For the users that you granted access to the mailbox, it should appear in Outlook automatically for them after they restart their Outlook application (perhaps after a few minutes delay).
CREATE A NEW SHARED MAILBOX ON THE EXCHANGE ADMIN CENTER
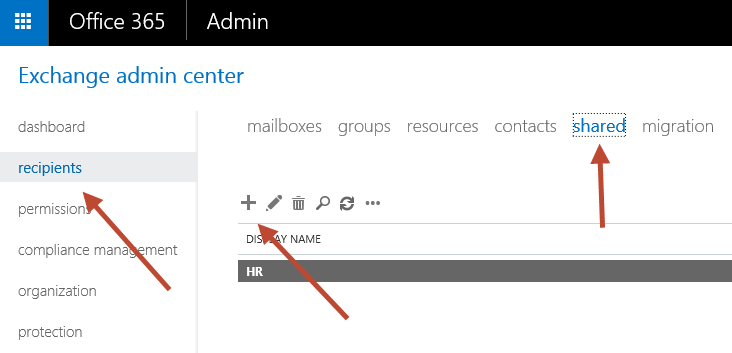
The Exchange admin center for Exchange Online is located athttps://outlook.office365.com/ecp. After logging in navigate to Recipients and then Shared. Click the + icon to create a new shared mailbox.
Enter a name and email address for the shared mailbox, and add any users that need access to open and send mail as the shared mailbox.
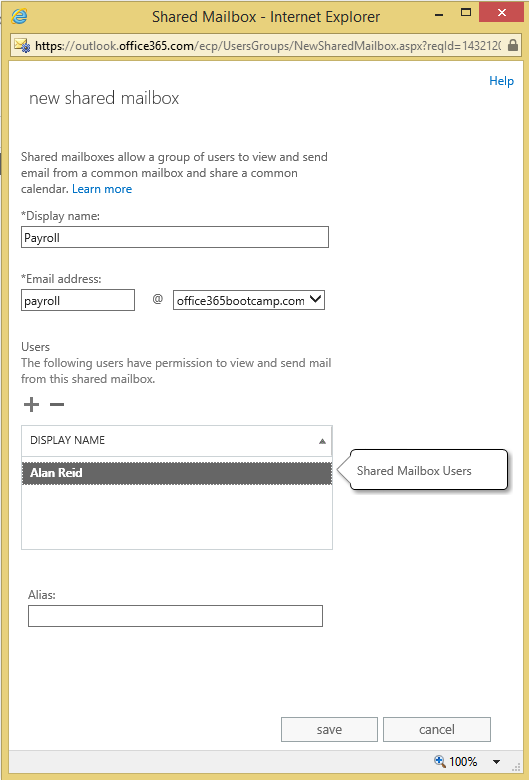
Click Save to complete the task.
As with the previous method, any user you granted access to the mailbox should see it appear automatically after restarting Outlook, or they can add it manually.
CREATING A NEW SHARED MAILBOX USING POWERSHELL
Naturally we can also create shared mailboxes using PowerShell. First connect to Exchange Online from a PowerShell session. Then run the New-Mailbox cmdlet with the -Sharedswitch, for example:
PS C:\> New-Mailbox -Shared -Name "Social Club" -PrimarySmtpAddress socialclub@office365bootcamp.com

Name                      Alias                ServerName       ProhibitSendQuota
----                      -----                ----------       -----------------
Social Club               SocialClub           sixpr04mb0621    49.5 GB (53,150,220,288 bytes)
To add permissions for a user to access the mailbox use Add-MailboxPermission:
PS C:\> Add-MailboxPermission -Identity "Social Club" -User Alan.Reid@office365bootcamp.net -AccessRights FullAccess

Identity             User                 AccessRights                                                IsInherited Deny
--------             ----                 ------------                                                ----------- ----
Social Club          APCPR04A001\Alan.... {FullAccess}                                                False       False
Finally, to add Send As permissions use Add-RecipientPermission:
PS C:\> Add-RecipientPermission -Identity "Social Club" -Trustee Alan.Reid@office365bootcamp.net -AccessRights SendAs


Confirm
Are you sure you want to perform this action?
Adding recipient permission 'SendAs' for user or group 'Alan.Reid@office365bootcamp.net' on recipient 'Social Club'.
[Y] Yes  [A] Yes to All  [N] No  [L] No to All  [?] Help (default is "Y"): y

Identity                Trustee                 AccessControlType       AccessRights            Inherited
--------                -------                 -----------------       ------------            ---------
Social Club             Alan.Reid               Allow                   {SendAs}                False
Once again, the shared mailbox should appear automatically for the user after they restart Outlook, or they can add it manually.
Now that we’ve covered how to create new shared mailboxes, let’s take a look at converting existing user mailboxes to shared mailboxes.
CONVERTING USER MAILBOXES TO SHARED MAILBOXES IN OFFICE 365
As I described earlier, a shared mailbox migrated to Office 365 using a staged or cutover migration will be created in Exchange Online as a user mailbox. User mailboxes require licenses or they are deleted in 30 days. To avoid consuming an Office 365 license you can convert the user mailbox to a shared mailbox very easily.
In the Exchange admin center navigate to Recipients and then Mailboxes, and find the mailbox you wish to convert. After selecting the mailbox you’ll notice a Convert to Shared Mailbox option to the right of the page.
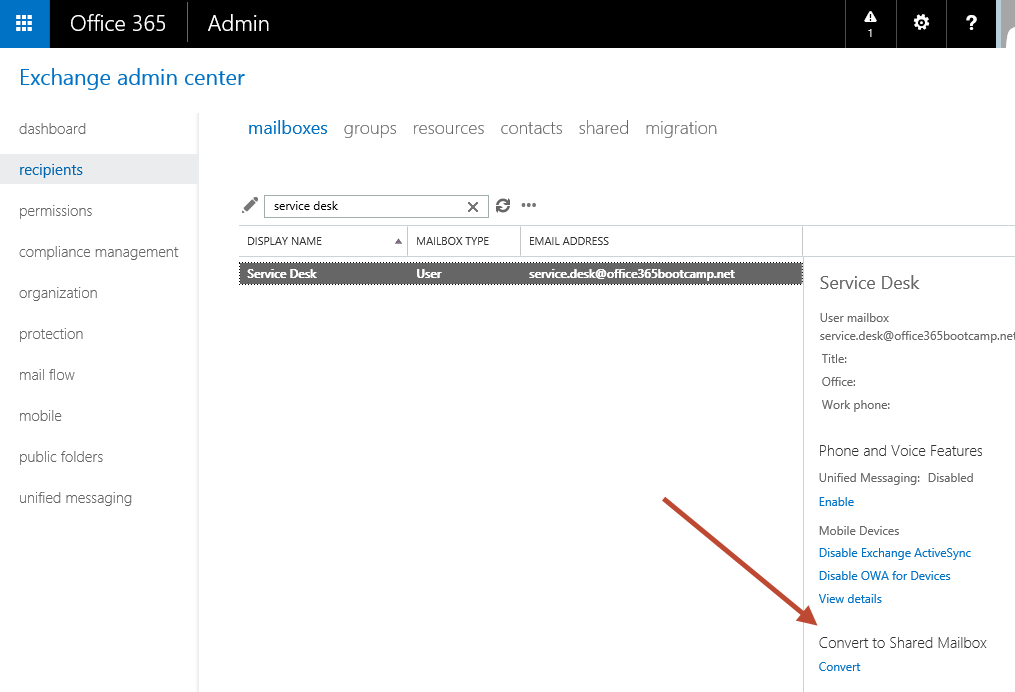
Click Convert, then click Yes to confirm. The conversion process takes just a few moments, and no data is lost in the conversion. When the conversion is complete click Close.
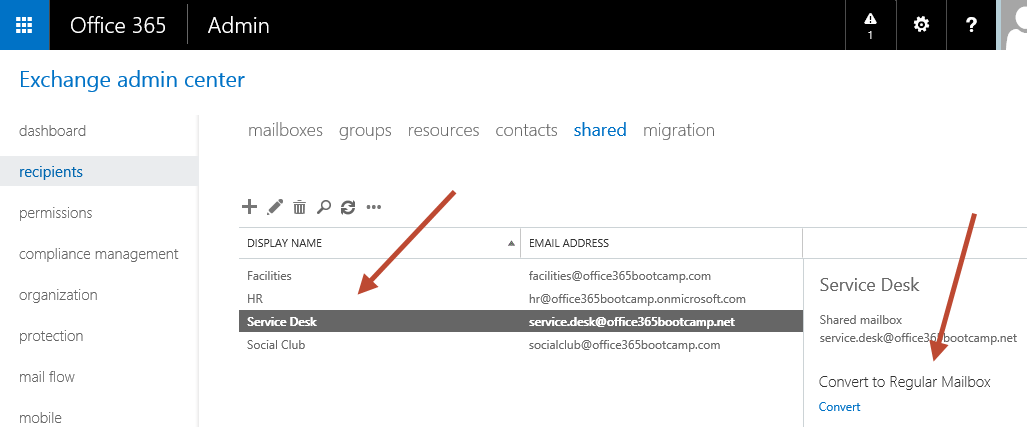
When you refresh the Mailboxes view you should no longer see the converted mailbox. Instead you can look in the Shared view to see it. Notice also that there is an option to convert it back to a regular mailbox if you need to.
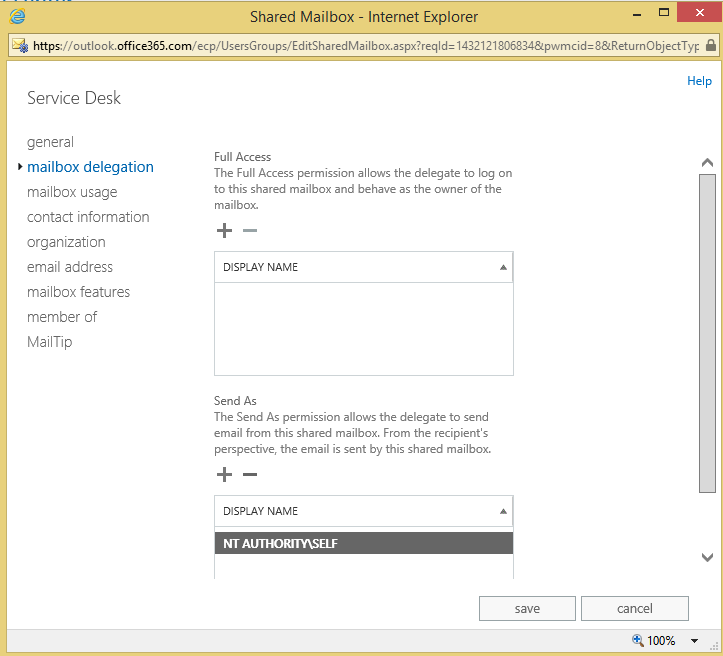
Click the Edit icon and then Mailbox Delegation to add permissions for any users who need to access or send as the converted shared mailbox. Alternatively you can do this using the PowerShell commands demonstrated earlier in this article.
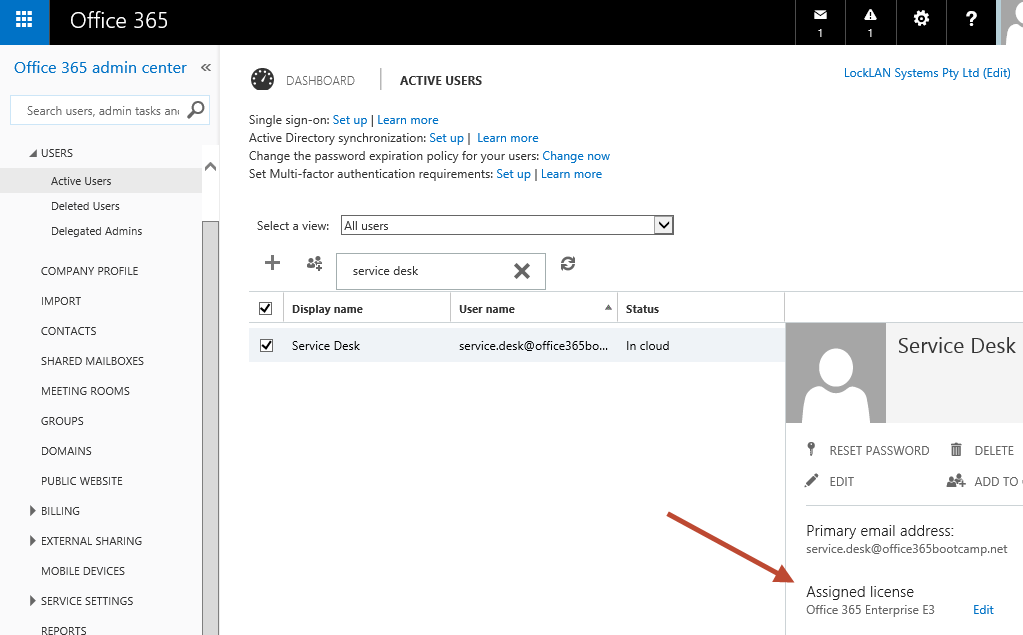
As a final step, if the user/mailbox had been assigned an Office 365 license before the conversion you can remove the license. However, do not delete the user account, as that will delete the mailbox as well.
SUMMARY
As you can see shared mailbox creation and conversion in Office 365 is quite simple. This is an important concept to understand because of the implications for licensing. If your company is spending Office 365 licenses on shared mailboxes they are quite possibly wasting money, and you have the opportunity to save some of those costs by using the correct mailbox type instead.
Got a project that needs expert IT support?
From Linux and Microsoft Server to VMware, networking, and more, our team at CR Tech is here to help.
Get personalized support today and ensure your systems are running at peak performance or make sure that your project turns out to be a successful one!
CONTACT US NOW

