Introduction
In my previous article, I explained that one of the best things that you can do to secure your wireless network is to avoid attaching wireless access points directly to segments of your private network that carry sensitive information. Instead, it is better to treat the wireless network as an untrusted medium and to require clients to prove themselves to be trustworthy prior to providing them with access to network resources.
This is very similar to the approach used by VPN servers. VPN clients attach to a network through the Internet. Like a wireless network, the Internet is not a trustworthy medium, so VPN clients must be authenticated before they are allowed to access network resources. Given that both VPNs and wireless networks require users to establish a connection from an untrusted medium, it is no wonder that the techniques for securing these connections are so similar.
Your Options For Securing Wireless Networks
Microsoft provides two main options for securing wireless networks (and there are also third party solutions available). One option is to authenticate wireless connections using PEAP-MS_CHAP v2 (which I will refer to as PEAP for simplicity) and the other option is to use EAP-TLS.
The primary difference between the two authentication methods is that the PEAP method provides authentication through the use of passwords. EAP-TLS uses digital certificates instead. These digital certificates can exist on a smart card, or they can be issued directly to a Windows client by an Enterprise Certificate Authority.
Generally speaking, PEAP is better suited to small and medium sized businesses because it is a little bit easier (and less costly) to deploy. EAP-TLS authentication is generally used in enterprise environments, but can be used in smaller organizations too. Both methods do a good job of controlling access to the wireless network and both allow you to centrally manage wireless client security.
Deploying an Enterprise Certificate Authority
Regardless of whether you end up using PEAP or EAP-TLS to authenticate wireless traffic, the authentication process is going to depend on the use of digital certificates. In the case of PEAP authentication, you can either deploy an Enterprise Certificate Authority, or you can purchase a certificate from a commercial certificate authority such as VeriSign or Go Daddy. If you choose to use EAP-TLS then you will need to have an enterprise certificate authority because client authentication is based on the use of certificates rather than passwords, and you have to be able to issue the necessary certificates to network clients.
Because both designs can make use of an enterprise certificate authority (and an enterprise certificate authority is required for one of the designs), I want to start out by showing you how to deploy and configure your own Enterprise Certificate Authority.
A Few Words of Caution
Before I get started, I need to give you a few words of caution. First, both of the designs that I am going to be showing you require you to have an Active Directory in place. These designs will not work if you have a workgroup network.
Another thing that you need to know is that we will be installing the Enterprise Certificate Authority onto a domain controller running Windows Server 2008 R2. Once the Enterprise Certificate Authority is in place, you will not be able to rename the domain controller.
You must also make every effort to harden the server that is acting as an enterprise certificate authority. Remember that if someone compromises your certificate authority, then they essentially own your network. Server hardening is beyond the scope of this article series, but a good place to start is to run Microsoft’s Security Configuration Wizard.
Most importantly, you must make sure that you back up the certificate authority on a regular basis. If this server were to fail, then the entire wireless authentication process will break down. If you have the resources then you can provide some redundancy by deploying some subordinate certificate authorities.
The Deployment Process
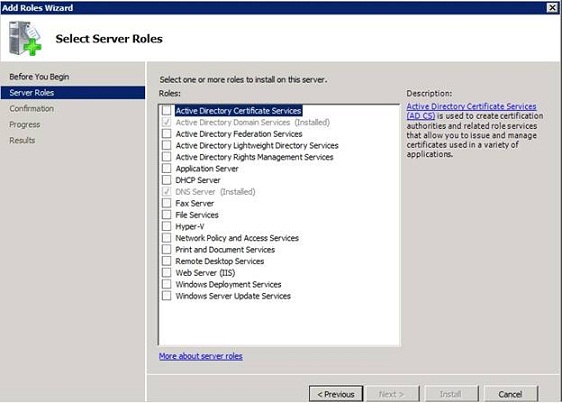
Begin the process by opening the Server Manager and selecting the Roles container. Click the Add Roles link and Windows will launch the Add Roles Wizard. Click Next to bypass the wizard’s Welcome screen and you will see a screen asking you which roles you want to install. Select the Active Directory Certificate Services role, as shown in Figure A, and click Next to continue.

Figure A: Select the Active Directory Certificate Services role.
You should now see an introductory screen to the Active Directory Certificate Services. Click Next and Windows will ask you which components you want to install. For right now select the Certification Authority and the Certification Authority Web Enrollment options. Depending on how your server is configured you may see a message telling you that you need to install some additional role services. If you receive this message then click the Add Required Role Services button.
Click Next, and Windows will ask you if you want to create a Standalone Certificate Authority or an Enterprise Certificate Authority. Choose the Enterprise option, and click Next.
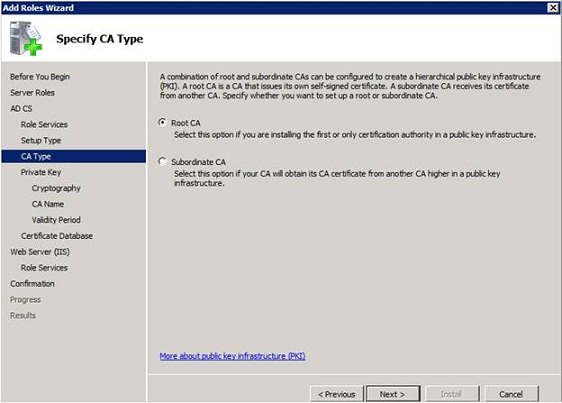
You should now see a message asking you if you want to create a Root CA or a Subordinate CA. Since this is our first (and possibly only) certificate authority, you must choose the Root CA option, as shown in Figure B.

Figure B: Choose the Root CA option and click Next.
The following screen asks you if you want to create a new private key or if you want to use an existing private key. Since this is a brand new deployment, go ahead and tell Windows to create a new private key.
When you click Next, Windows will ask you to configure the cryptographic settings for the Certificate Authority. Go ahead and click Next to accept the defaults.
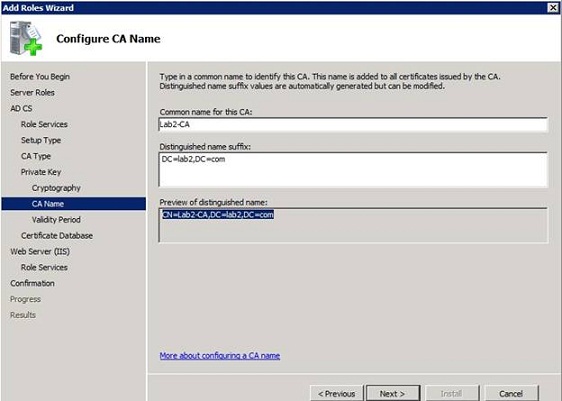
You will now be promoted to provide a common name for the Certificate Authority. Although you can go with the defaults, I recommend changing the common name to something easy to remember. For example, you can see in Figure C that I have named my Certificate Authority Lab2-CA.

Figure C: You should pick a common name that is easy to remember.
Click Next, and you will be prompted to choose a validity period for the certificates issued by the Certificate Authority. The default is five years, which is fine, but you can adjust this value if you like.
Click Next, and Windows will ask you to choose a location for the certificate database. Keep in mind what I said earlier on about how important it is to protect the certificate store. You should choose a location that exists on a fault tolerant array if possible, and you should make note of the location so that you can back it up.
Depending on whether or not you were required to add the IIS role service to your server, the next screen that you see may be an introduction to IIS. Click Next to move on to the next screen.
You should now see a screen asking you if you want to install any additional role services. Windows automatically picks all of the required role services, so there is no need to add anything extra. Just click Next to continue.
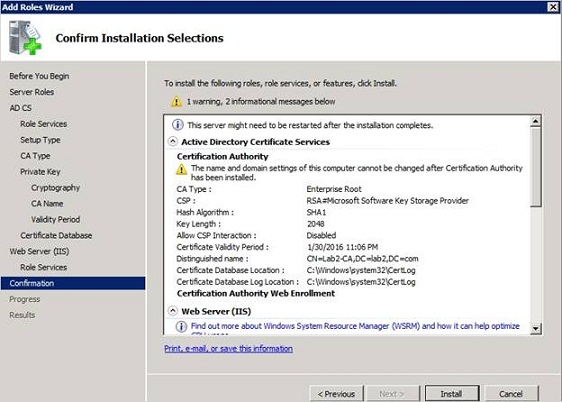
You should now see a summary of the configuration options that you have chosen, as shown in Figure D. Take a moment to verify that everything appears to be correct, and then click Install. When the installation process completes, click Close.

Figure D: Read over the configuration summary to make sure that it is correct.
Conclusion
Now that I have shown you how to deploy an enterprise certificate authority, it is time to begin building the rest of the infrastructure required to secure our wireless network. In the next part of this article series, I will begin showing you how to implement PEAP based wireless security.
Got a project that needs expert IT support?
From Linux and Microsoft Server to VMware, networking, and more, our team at CR Tech is here to help.
Get personalized support today and ensure your systems are running at peak performance or make sure that your project turns out to be a successful one!
CONTACT US NOW

